Spring Boot + Spring MVC + Role Based Spring Security + JPA + Thymeleaf + MySQL Tutorial
In this tutorial, we will learn how to use the Spring Boot Security Starter to secure Spring MVC-based web applications. We will develop step by step Message Storing Spring MVC web application(securing with spring security) using spring boot, spring MVC, role-based spring security, JPA, Thymeleaf, and MySQL.
Spring Security is a framework for securing Java-based applications at various layers with great flexibility and customizability. Spring Security provides authentication and authorization support against database authentication, LDAP, Java Authentication and Authorization Service (JAAS), and many more. Spring Security provides support for dealing with common attacks like CSRF, XSS, and session fixation protection, with minimal configuration.
- Authentication refers to the process of verifying the user, which is typically done by asking for credentials.
- Authorization refers to the process of verifying whether or not the user is allowed to do a certain activity.
Check out the latest Spring security tutorial - Spring Boot User Registration and Login Example Tutorial
In this tutorial, we will use Java-based configuration support for security. Using Spring Security in the Spring Boot application became easier with its autoconfiguration features.
Table of Contents
- Spring Security with its autoconfiguration features
- What we’ll build
- Tools and Technologies Used
- Database Design for Role-Based Spring Security
- Creating and Importing a Project
- Packaging Structure
- The pom.xml File
- Create the JPA entities called Users, Roles, and Message
- Spring Data JPA Repository Interface - UserRepository.java
- Spring Data JPA Repository Interface - MessageRepository.java
- UserDetailsService Implementation
- Customized Spring Security Configuration Extending WebSecurityConfigurerAdapter
- Spring WebMVC Configuration
- Spring MVC Controller - HomeController.java
- MySQL Configuration - application.properties
- Implementing the Remember-Me Feature
- Persistent Tokens
- Thymeleaf layout View
- Thymeleaf Login View
- Thymeleaf Userhome View
- Thymeleaf Adminhome View
- Index View
- Sample data for Users and Roles - src/main/resources/data.sql
- Running Application
- Demo
1. Spring Security with its autoconfiguration features
Before moving to secure actual projects, let's discuss spring boot provided autoconfiguration of spring security for a quick start.
Adding the Spring Security Starter (spring-boot-starter-security) to a Spring Boot application will:
- Enable HTTP basic security
- Register the AuthenticationManager bean with an in-memory store and a single user
- Ignore paths for commonly used static resource locations (such as /css/, /js/, /images/**, etc.)
- Enable common low-level features such as XSS, CSRF, caching, etc.
Add the below dependencies to the pom.xml file
<dependency>
            <groupId>org.springframework.boot</groupId>
            <artifactId>spring-boot-starter-web</artifactId>
        </dependency>
        <dependency>
            <groupId>org.springframework.boot</groupId>
            <artifactId>spring-boot-starter-thymeleaf</artifactId>
        </dependency>
        <dependency>
            <groupId>org.springframework.boot</groupId>
            <artifactId>spring-boot-starter-security</artifactId>
        </dependency>
Now if you run the application and access http://localhost:8080, you will be prompted to enter the user credentials. The default user is the user and the password is auto-generated. You can find it in the console log.
Using default security password: 78fa095d-3f4c-48b1-ad50-e24c31d5cf35
You can change the default user credentials in application.properties as follows:
security.user.name=admin
    security.user.password=secret
    security.user.role=USER,ADMIN
Okay, this is nice for a quick demo. But in our actual projects, we may want to implement role-based access control using a persistence data store such as a database. Also, you might want to fine-tune access to resources (URLs, service layer methods, etc.) based on roles.
Now it's time to see how to customize the default Spring Security autoconfiguration and develop step by step Spring MVC web application.
2. What we’ll build
We will develop step by step message storing Spring MVC web application(securing with spring security) using spring boot, spring MVC, role-based spring security, JPA, Thymeleaf, and MySQL.
3. Tools and Technologies Used
- Spring Boot - 2+
- JDK - 1.8 or later
- Spring Framework - 5+
- Maven - 3.2+
- IDE - Eclipse or Spring Tool Suite (STS)
- MYSQL - 5.1.47
- Spring Security - 5+
- Thymeleaf-Spring5 - 3.0.9 RELEASE
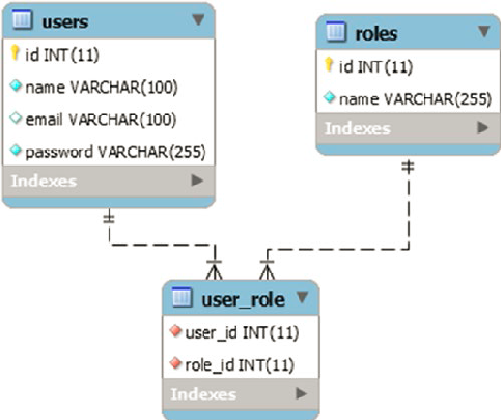
4. Database Design for Role-Based Spring Security
First, we’ll create the database tables below to store users and roles.
5. Creating and Importing a Project
There are many ways to create a Spring Boot application. The simplest way is to use Spring Initializr at http://start.spring.io/, which is an online Spring Boot application generator.
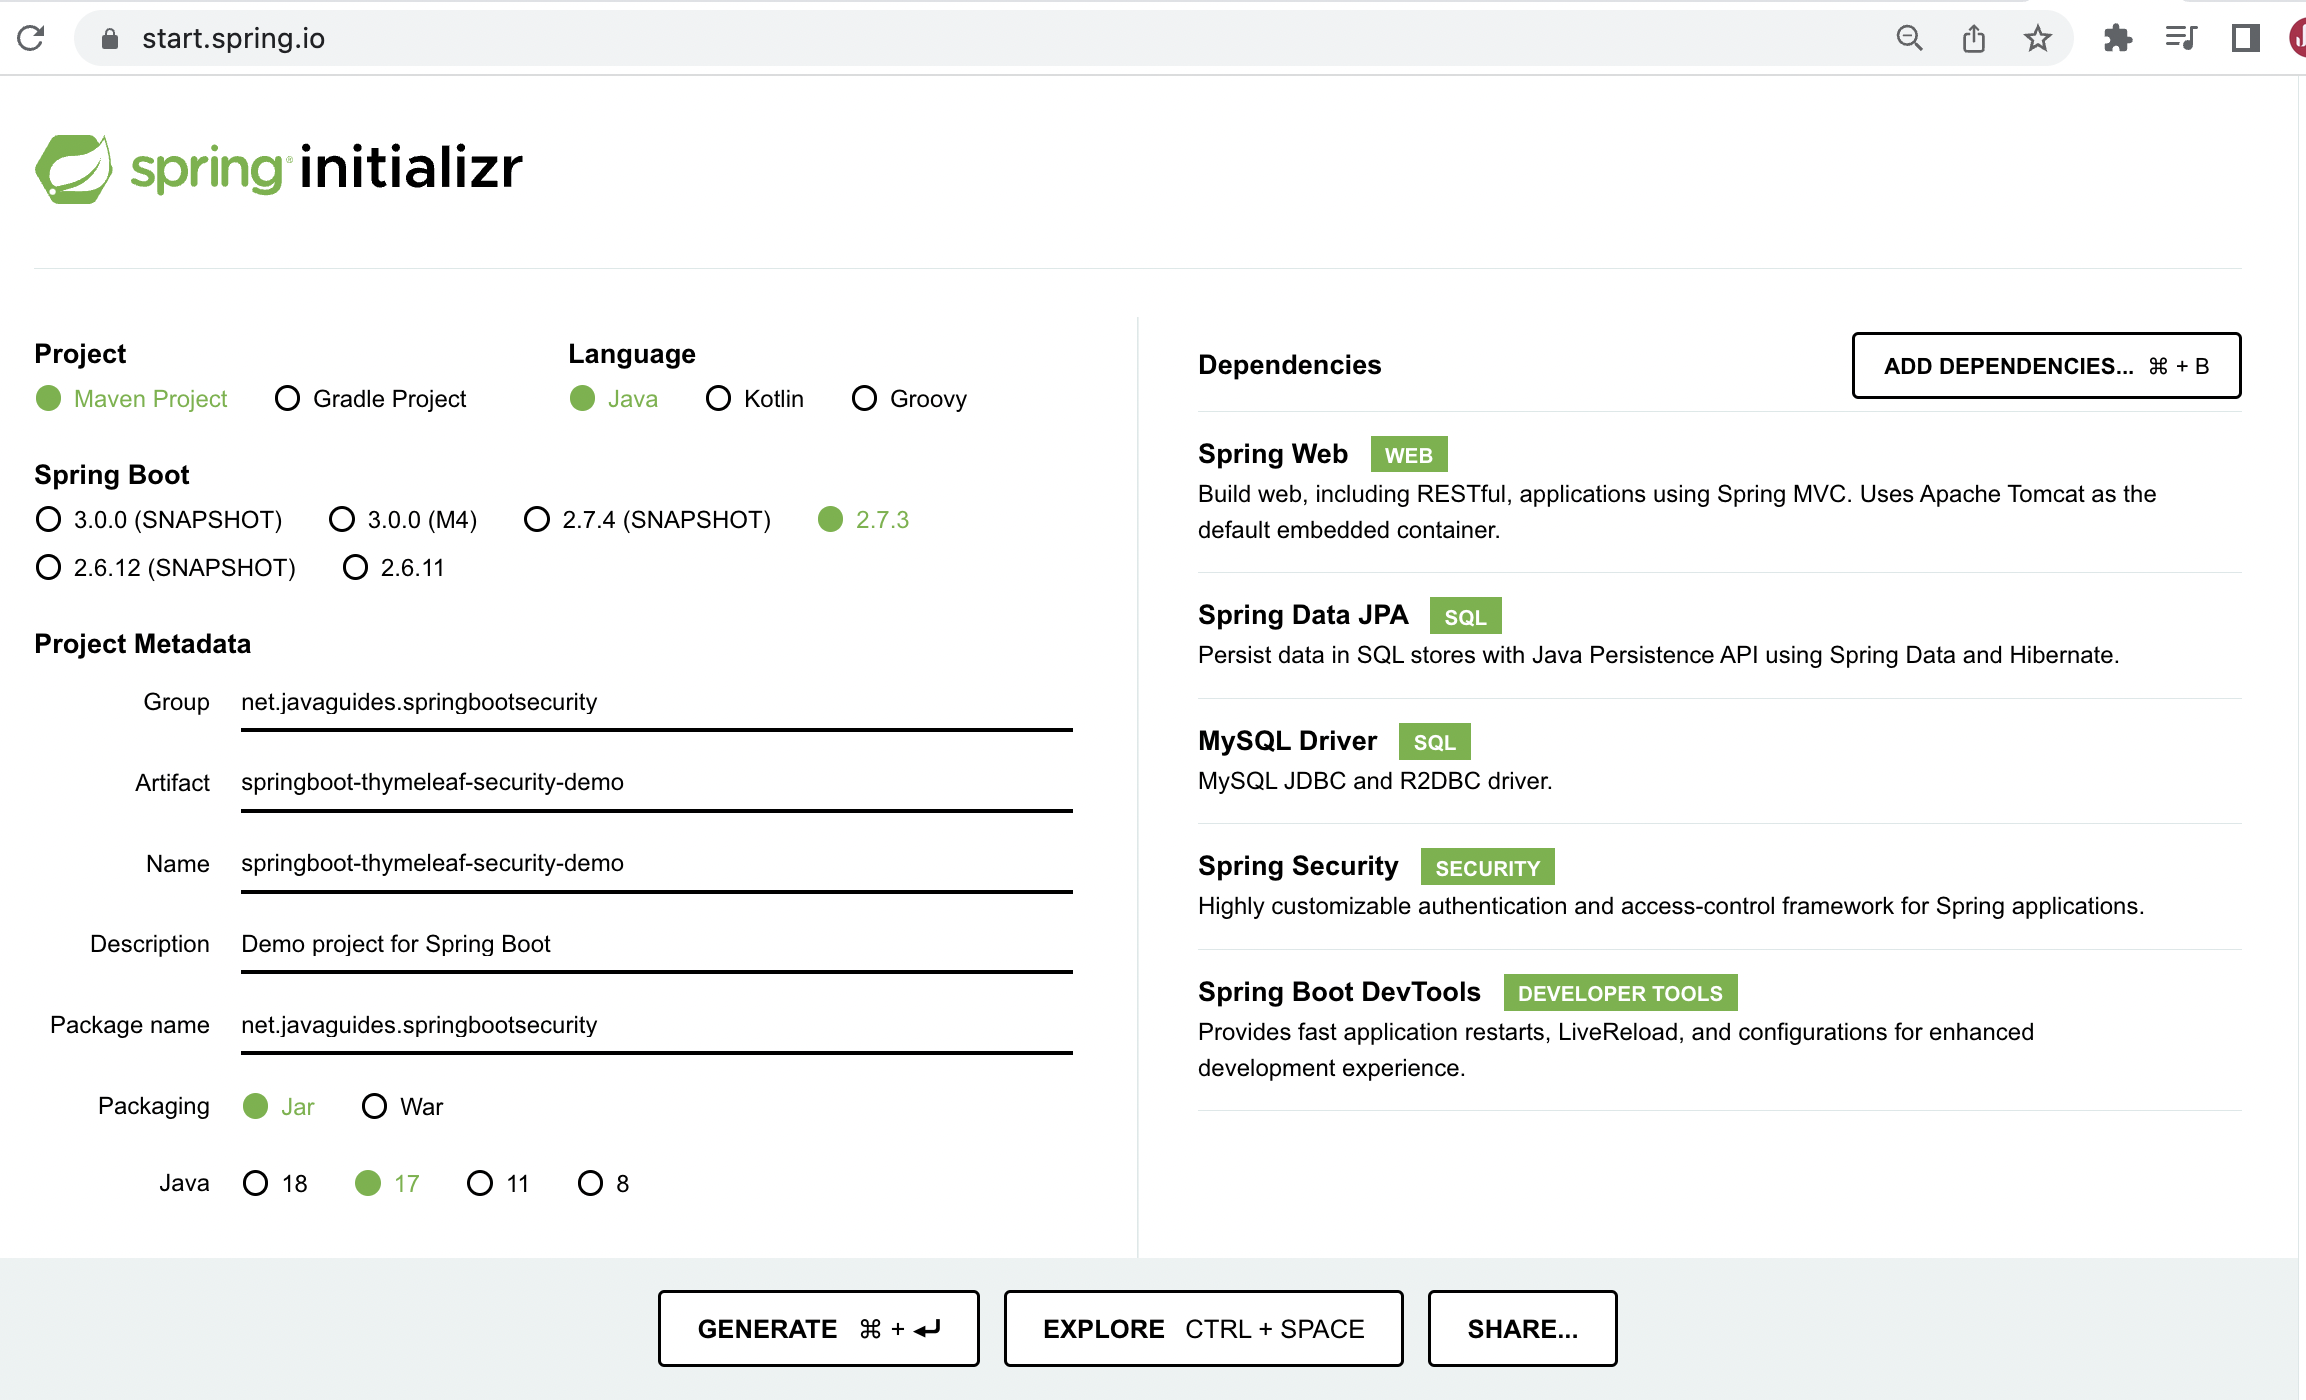
Look at the above diagram, we have specified the following details:
- Generate: Maven Project
- Java Version: 1.8 (Default)
- Spring Boot:2.7.3
- Group: net.javaguides.springbootsecurity
- Artifact: springboot-thymeleaf-security-demo
- Name: springboot-thymeleaf-security-demo
- Description: springboot-thymeleaf-security-demo
- Package Name : net.javaguides.springbootsecurity
- Packaging: jar (This is the default value)
- Dependencies: Web, JPA, MySQL, DevTools, Security
Once, all the details are entered, click on Generate Project button will generate a spring boot project and downloads it. Next, Unzip the downloaded zip file and import it into your favorite IDE.
6. Packaging Structure
Following is the packing structure for your reference -
.PNG)
7. The pom.xml File
<?xml version="1.0" encoding="UTF-8"?>
    <project xmlns="http://maven.apache.org/POM/4.0.0"
     xmlns:xsi="http://www.w3.org/2001/XMLSchema-instance"
     xsi:schemaLocation="http://maven.apache.org/POM/4.0.0
          http://maven.apache.org/maven-v4_0_0.xsd">
        <modelVersion>4.0.0</modelVersion>
        <groupId>net.javaguides.springbootsecurity</groupId>
        <artifactId>springboot-thymeleaf-security-demo</artifactId>
        <packaging>jar</packaging>
        <version>1.0-SNAPSHOT</version>

        <parent>
            <groupId>org.springframework.boot</groupId>
            <artifactId>spring-boot-starter-parent</artifactId>
            <version>2.7.3</version>
            <relativePath /> <!-- lookup parent from repository -->
        </parent>

        <properties>
            <project.build.sourceEncoding>UTF-8</project.build.sourceEncoding>
            <project.reporting.outputEncoding>UTF-8</project.reporting.outputEncoding>
            <java.version>1.8</java.version>
        </properties>

        <dependencies>
            <dependency>
                <groupId>org.springframework.boot</groupId>
                <artifactId>spring-boot-starter-web</artifactId>
            </dependency>
            <dependency>
                <groupId>org.springframework.boot</groupId>
                <artifactId>spring-boot-starter-thymeleaf</artifactId>
            </dependency>
            <dependency>
                 <groupId>nz.net.ultraq.thymeleaf</groupId>
                 <artifactId>thymeleaf-layout-dialect</artifactId>
            </dependency>
            <dependency>
                <groupId>org.springframework.boot</groupId>
                <artifactId>spring-boot-starter-security</artifactId>
            </dependency>
             <dependency>
                 <groupId>org.thymeleaf.extras</groupId>
                 <artifactId>thymeleaf-extras-springsecurity4</artifactId>
            </dependency>
            <dependency>
                <groupId>org.springframework.boot</groupId>
                <artifactId>spring-boot-starter-data-jpa</artifactId>
            </dependency>
            <dependency>
                <groupId>org.springframework.boot</groupId>
                <artifactId>spring-boot-starter-test</artifactId>
                <scope>test</scope>
            </dependency>
            <dependency>
                <groupId>org.springframework.boot</groupId>
                <artifactId>spring-boot-devtools</artifactId>
                <optional>true</optional>
            </dependency>
            <dependency>
                <groupId>com.h2database</groupId>
                <artifactId>h2</artifactId>
            </dependency>
            <dependency>
                <groupId>mysql</groupId>
                <artifactId>mysql-connector-java</artifactId>
            </dependency>
        </dependencies>

        <build>
            <plugins>
                <plugin>
                    <groupId>org.springframework.boot</groupId>
                    <artifactId>spring-boot-maven-plugin</artifactId>
                </plugin>
            </plugins>
        </build>
    </project>
Note that we have used Spring Data JPA starter to talk to the MySQL database.
8. Create the JPA entities - User, Role, and Message
User JPA Entity
package net.javaguides.springbootsecurity.entities;

    import java.util.List;


    import javax.persistence.CascadeType;
    import javax.persistence.Column;
    import javax.persistence.Entity;
    import javax.persistence.GeneratedValue;
    import javax.persistence.GenerationType;
    import javax.persistence.Id;
    import javax.persistence.JoinColumn;
    import javax.persistence.JoinTable;
    import javax.persistence.ManyToMany;
    import javax.persistence.Table;
    import javax.validation.constraints.Size;

    import org.hibernate.validator.constraints.Email;
    import org.hibernate.validator.constraints.NotEmpty;


    @Entity
    @Table(name="users")
    public class User
    {
        @Id @GeneratedValue(strategy=GenerationType.AUTO)
        private Integer id;
        @Column(nullable=false)
        @NotEmpty()
        private String name;
        @Column(nullable=false, unique=true)
        @NotEmpty
        @Email(message="{errors.invalid_email}")
        private String email;
        @Column(nullable=false)
        @NotEmpty
        @Size(min=4)
        private String password;

        @ManyToMany(cascade=CascadeType.MERGE)
        @JoinTable(
           name="user_role",
           joinColumns={@JoinColumn(name="USER_ID", referencedColumnName="ID")},
           inverseJoinColumns={@JoinColumn(name="ROLE_ID", referencedColumnName="ID")})
        private List roles;

        public Integer getId()
        {
            return id;
        }
        public void setId(Integer id)
        {
            this.id = id;
        }
        public String getName()
        {
            return name;
        }
        public void setName(String name)
        {
            this.name = name;
        }
        public String getEmail()
        {
            return email;
        }
        public void setEmail(String email)
        {
            this.email = email;
        }
        public String getPassword()
        {
            return password;
        }
        public void setPassword(String password)
        {
            this.password = password;
        }
        public List getRoles()
        {
            return roles;
        }
        public void setRoles(List roles)
        {
            this.roles = roles;
        }
    }
Role JPA Entity
package net.javaguides.springbootsecurity.entities;

    import java.util.List;


    import javax.persistence.Column;
    import javax.persistence.Entity;
    import javax.persistence.GeneratedValue;
    import javax.persistence.GenerationType;
    import javax.persistence.Id;
    import javax.persistence.ManyToMany;
    import javax.persistence.Table;

    import org.hibernate.validator.constraints.NotEmpty;

    @Entity
    @Table(name = "roles")
    public class Role {
        @Id @GeneratedValue(strategy = GenerationType.AUTO)
        private Integer id;
        @Column(nullable = false, unique = true)
        @NotEmpty
        private String name;

        @ManyToMany(mappedBy = "roles")
        private List < User > users;

        public Integer getId() {
            return id;
        }

        public void setId(Integer id) {
            this.id = id;
        }

        public String getName() {
            return name;
        }

        public void setName(String name) {
            this.name = name;
        }

        public List < User > getUsers() {
            return users;
        }

        public void setUsers(List < User > users) {
            this.users = users;
        }
    }
Message JPA Entity
package net.javaguides.springbootsecurity.entities;

        import javax.persistence.Column;
        import javax.persistence.Entity;
        import javax.persistence.GeneratedValue;
        import javax.persistence.GenerationType;
        import javax.persistence.Id;
        import javax.persistence.Table;


        @Entity
        @Table(name = "messages")
        public class Message {
            @Id
            @GeneratedValue(strategy = GenerationType.AUTO)
            private Integer id;

            @Column(nullable = false)
            private String content;

            public Integer getId() {
                return id;
            }

            public void setId(Integer id) {
                this.id = id;
            }

            public String getContent() {
                return content;
            }

            public void setContent(String content) {
                this.content = content;
            }
        }
Next, create the Spring Data JPA repository for the user entity.
9. Spring Data JPA Repository Interface - UserRepository.java
package net.javaguides.springbootsecurity.repositories;

            import java.util.Optional;
            import org.springframework.data.jpa.repository.JpaRepository;
            import net.javaguides.springbootsecurity.entities.User;


            public interface UserRepository extends JpaRepository
            {
                Optional findByEmail(String email);
            }
Next, create the Spring Data JPA repository for the Message entity.
10. Spring Data JPA Repository Interface - MessageRepository.java
package net.javaguides.springbootsecurity.repositories;

                import org.springframework.data.jpa.repository.JpaRepository;

                import net.javaguides.springbootsecurity.entities.Message;


                public interface MessageRepository extends JpaRepository<Message, Integer>{

                }
11. UserDetailsService Implementation
Spring Security uses the UserDetailsService interface, which contains the loadUserByUsername(String username) method to look up UserDetails for a given username.
The UserDetails interface represents an authenticated user object and Spring Security provides an out-of-the-box implementation of org.springframework.security.core.userdetails.User.
Now we implement a UserDetailsService to get UserDetails from the database.
package net.javaguides.springbootsecurity.security;

            import java.util.Collection;

            import org.springframework.beans.factory.annotation.Autowired;
            import org.springframework.security.core.GrantedAuthority;
            import org.springframework.security.core.authority.AuthorityUtils;
            import org.springframework.security.core.userdetails.UserDetails;
            import org.springframework.security.core.userdetails.UserDetailsService;
            import org.springframework.security.core.userdetails.UsernameNotFoundException;
            import org.springframework.stereotype.Service;
            import org.springframework.transaction.annotation.Transactional;

            import net.javaguides.springbootsecurity.entities.User;
            import net.javaguides.springbootsecurity.repositories.UserRepository;


            @Service
            @Transactional
            public class CustomUserDetailsService implements UserDetailsService {

                @Autowired
                private UserRepository userRepository;

                @Override
                public UserDetails loadUserByUsername(String userName) throws UsernameNotFoundException {
                    User user = userRepository.findByEmail(userName)
                   .orElseThrow(() -> new UsernameNotFoundException("Email " + userName + " not found"));
                     return new org.springframework.security.core.userdetails.User(user.getEmail(), user.getPassword(),
                     getAuthorities(user));
                }

                private static Collection getAuthorities(User user) {
                    String[] userRoles = user.getRoles().stream().map((role) -> role.getName()).toArray(String[]::new);
                    Collection authorities = AuthorityUtils.createAuthorityList(userRoles);
                    return authorities;
                }
            }
Spring Boot implemented the default Spring Security autoconfiguration in SecurityAutoConfiguration. To switch the default web application security configuration and provide our own customized security configuration, we can create a configuration class that extends WebSecurityConfigurerAdapter and is annotated with @EnableWebSecurity.
Now we’ll create a configuration class that extends WebSecurityConfigurerAdapter to customize the default Spring Security configuration.
12. Customized Spring Security Configuration Extending WebSecurityConfigurerAdapter
package net.javaguides.springbootsecurity.config;

                import javax.sql.DataSource;

                import org.springframework.beans.factory.annotation.Autowired;
                import org.springframework.context.annotation.Bean;
                import org.springframework.context.annotation.Configuration;
                import org.springframework.security.config.annotation.authentication.builders.AuthenticationManagerBuilder;
                import org.springframework.security.config.annotation.method.configuration.EnableGlobalMethodSecurity;
                import org.springframework.security.config.annotation.web.builders.HttpSecurity;
                import org.springframework.security.config.annotation.web.configuration.EnableWebSecurity;
                import org.springframework.security.config.annotation.web.configuration.WebSecurityConfigurerAdapter;
                import org.springframework.security.core.userdetails.UserDetailsService;
                import org.springframework.security.crypto.bcrypt.BCryptPasswordEncoder;
                import org.springframework.security.crypto.password.PasswordEncoder;
                import org.springframework.security.web.authentication.rememberme.JdbcTokenRepositoryImpl;
                import org.springframework.security.web.authentication.rememberme.PersistentTokenRepository;
                import org.springframework.security.web.util.matcher.AntPathRequestMatcher;

                @Configuration
                @EnableWebSecurity
                @EnableGlobalMethodSecurity(securedEnabled = true, proxyTargetClass = true)
                public class WebSecurityConfig extends WebSecurityConfigurerAdapter {

                    @Autowired
                    private UserDetailsService customUserDetailsService;

                    @Autowired
                    private DataSource dataSource;

                    @Bean
                    public PasswordEncoder passwordEncoder() {
                        return new BCryptPasswordEncoder();
                    }

                    @Autowired
                    public void configureGlobal(AuthenticationManagerBuilder auth) throws Exception {
                        auth
                         .userDetailsService(customUserDetailsService)
                         .passwordEncoder(passwordEncoder());
                    }

                    @Override
                    protected void configure(HttpSecurity http) throws Exception {
                        http
                         .headers()
                          .frameOptions().sameOrigin()
                          .and()
                            .authorizeRequests()
                             .antMatchers("/resources/**", "/webjars/**","/assets/**").permitAll()
                                .antMatchers("/").permitAll()
                                .antMatchers("/admin/**").hasRole("ADMIN")
                                .anyRequest().authenticated()
                                .and()
                            .formLogin()
                                .loginPage("/login")
                                .defaultSuccessUrl("/home")
                                .failureUrl("/login?error")
                                .permitAll()
                                .and()
                            .logout()
                             .logoutRequestMatcher(new AntPathRequestMatcher("/logout"))
                             .logoutSuccessUrl("/login?logout")
                             .deleteCookies("my-remember-me-cookie")
                                .permitAll()
                                .and()
                             .rememberMe()
                              //.key("my-secure-key")
                              .rememberMeCookieName("my-remember-me-cookie")
                              .tokenRepository(persistentTokenRepository())
                              .tokenValiditySeconds(24 * 60 * 60)
                              .and()
                            .exceptionHandling()
                              ;
                    }

                    PersistentTokenRepository persistentTokenRepository(){
                     JdbcTokenRepositoryImpl tokenRepositoryImpl = new JdbcTokenRepositoryImpl();
                     tokenRepositoryImpl.setDataSource(dataSource);
                     return tokenRepositoryImpl;
                    }
                }
This example configures CustomUserDetailsService and BCryptPasswordEncoder to be used by AuthenticationManager instead of the default in-memory database with a single user with a plaintext password.
The configure(HttpSecurity http) method is configured to:
- Ignore the static resource paths "/resources/", "/webjars/", and "/assets/**"
- Allow everyone to have access to the root URL "/"
- Restrict access to URLs that start with /admin/ to only users with the ADMIN role
- All other URLs should be accessible to authenticated users only
We are also configuring custom form-based login parameters and making them accessible to everyone. The example also configures the URL to redirect the users to the /accessDenied URL if they try to access a resource they don’t have access to. We are going to use Thymeleaf view templates for rendering views. The thymeleaf-extrasspringsecurity4 module provides Thymeleaf Spring Security dialect attributes (sec:authentication, sec:authorize, etc.) to conditionally render parts of the view based on authentication status, logged-in user roles, etc.
Add the following dependency to use the Thymeleaf Spring Security dialect.
            <dependency>
                <groupId>org.thymeleaf.extras</groupId>
                <artifactId>thymeleaf-extras-springsecurity4</artifactId>
            </dependency>
Now we need to create a configuration class for providing MVC configuration.
13. Spring WebMVC Configuration
package net.javaguides.springbootsecurity.config;

                import org.springframework.beans.factory.annotation.Autowired;
                import org.springframework.context.MessageSource;
                import org.springframework.context.annotation.Bean;
                import org.springframework.context.annotation.Configuration;
                import org.springframework.validation.Validator;
                import org.springframework.validation.beanvalidation.LocalValidatorFactoryBean;
                import org.springframework.web.servlet.config.annotation.ViewControllerRegistry;
                import org.springframework.web.servlet.config.annotation.WebMvcConfigurer;
                import org.thymeleaf.extras.springsecurity4.dialect.SpringSecurityDialect;


                @Configuration
                public class WebConfig implements WebMvcConfigurer
                {

                    @Autowired
                    private MessageSource messageSource;

                    @Override
                    public void addViewControllers(ViewControllerRegistry registry)
                    {
                        registry.addViewController("/").setViewName("index");
                        registry.addViewController("/login").setViewName("login");
                        //registry.addViewController("/home").setViewName("userhome");
                        registry.addViewController("/admin/home").setViewName("adminhome");
                        //registry.addViewController("/403").setViewName("403");
                    }

                    @Override
                    public Validator getValidator() {
                        LocalValidatorFactoryBean factory = new LocalValidatorFactoryBean();
                        factory.setValidationMessageSource(messageSource);
                        return factory;
                    }

                    @Bean
                    public SpringSecurityDialect securityDialect() {
                         return new SpringSecurityDialect();
                    }
                }
Note that we have configured view controllers to specify which view to render for which URL. Also, it registers SpringSecurityDialect to enable using the Thymeleaf Spring Security dialect.
14. Spring MVC Controller - HomeController.java
Create a package named "net.javaguides.springbootsecurity.web" and inside this package, create our HomeController which redirects appropriate views:
package net.javaguides.springbootsecurity.web;

                import org.springframework.beans.factory.annotation.Autowired;
                import org.springframework.stereotype.Controller;
                import org.springframework.ui.Model;
                import org.springframework.web.bind.annotation.GetMapping;
                import org.springframework.web.bind.annotation.PostMapping;

                import net.javaguides.springbootsecurity.entities.Message;
                import net.javaguides.springbootsecurity.repositories.MessageRepository;

                @Controller
                public class HomeController {
                    @Autowired
                    private MessageRepository messageRepository;

                    @GetMapping("/home")
                    public String home(Model model) {
                        model.addAttribute("msgs", messageRepository.findAll());
                        return "userhome";
                    }

                    @PostMapping("/messages")
                    public String saveMessage(Message message) {
                        messageRepository.save(message);
                        return "redirect:/home";
                    }
                }
5. MySQL Configuration - application.properties
################### DataSource Configuration ##########################
            spring.datasource.driver-class-name=com.mysql.jdbc.Driver
            spring.datasource.url=jdbc:mysql://localhost:3306/test
            spring.datasource.username=root
            spring.datasource.password=root

            spring.datasource.initialization-mode=always

            ################### Hibernate Configuration ##########################

            spring.jpa.hibernate.ddl-auto=update
            spring.jpa.show-sql=true

            #security.user.name=admin
            #security.user.password=secret
            #security.user.role=USER,ADMIN
16. Implementing the Remember-Me Feature
Spring Security provides the Remember-Me feature so that applications can remember the identity of a user between sessions. To use the Remember-Me functionality, you just need to send the HTTP parameter remember-me.
<input type="checkbox" name="remember-me"> Remember Me
Spring Security provides the following two implementations of the Remember-Me feature out-of-the-box:
- Simple hash-based token as a cookie —This approach creates a token by hashing the user identity information and setting it as a cookie on the client browser.
- Persistent token —This approach uses a persistent store like a relational database to store the tokens.
In this tutorial, we will use the Persistent token approach.
17. Persistent Tokens
We will implement Spring Security Remember-Me feature, which can be used to store the generated tokens in persistent storage such as a database. The persistent tokens approach is implemented using org.springframework.security.web.authentication.rememberme.
PersistentTokenBasedRememberMeServices, which internally uses the PersistentTokenRepository interface to store the tokens.
Spring provides the following two implementations of PersistentTokenRepository out-of-the-box.
- InMemoryTokenRepositoryImpl can be used to store tokens in-memory (not recommended for production use).
- JdbcTokenRepositoryImpl can be used to store tokens in a database.
The JdbcTokenRepositoryImpl stores the tokens in the persistent_logins table.
persistent_logins table
create table persistent_logins
            (
               username varchar(64) not null,
               series varchar(64) primary key,
               token varchar(64) not null,
               last_used timestamp not null
            );
Now that we have all the configurations ready, it’s time to create views using Thymeleaf.
18. Thymeleaf layout View
The most important part of this page is layout:fragment="content". This is the heart of the decorator page (layout). This is the tutorial uses Standard Thymeleaf Layout System. Read more about Thymeleaf layouts on https://www.thymeleaf.org/doc/articles/layouts.html
<!DOCTYPE html>
            <html xmlns="http://www.w3.org/1999/xhtml"
             xmlns:th="http://www.thymeleaf.org"
             xmlns:layout="http://www.ultraq.net.nz/thymeleaf/layout"
             xmlns:sec="http://www.thymeleaf.org/thymeleaf-extras-springsecurity3">
            <head>
            <meta charset="utf-8" />
            <meta http-equiv="X-UA-Compatible" content="IE=edge" />
            <title layout:title-pattern="$DECORATOR_TITLE - $CONTENT_TITLE">SpringBoot
             Thymeleaf</title>
            <meta content="width=device-width, initial-scale=1, maximum-scale=1, user-scalable=no"
             name="viewport" />
            <link rel="stylesheet"
             th:href="@{/assets/bootstrap/css/bootstrap.min.css}" />
            <link rel="stylesheet"
             th:href="@{/assets/font-awesome-4.5.0/css/font-awesome.min.css}" />
            <link rel="stylesheet" th:href="@{/assets/css/styles.css}" />
            <style>
            .footer {
                position: fixed;
                left: 0;
                bottom: 0;
                width: 100%;
                background-color: black;
                color: white;
                height: 100px;
                text-align: center;
            }
            </style>
            </head>
            <body>
             <nav class="navbar navbar-inverse navbar-fixed-top">
              <div class="container">
               <div class="navbar-header">
                <button type="button" class="navbar-toggle collapsed"
                 data-toggle="collapse" data-target="#navbar" aria-expanded="false"
                 aria-controls="navbar">
                 <span class="sr-only">Toggle navigation</span> <span
                  class="icon-bar"></span> <span class="icon-bar"></span> <span
                  class="icon-bar"></span>
                </button>
                <a class="navbar-brand" href="#" th:href="@{/}">SpringBoot
                 Thymeleaf</a>
               </div>
               <div id="navbar" class="collapse navbar-collapse">
                <ul class="nav navbar-nav">
                 <li sec:authorize="isAuthenticated()"><a th:href="@{/logout}">Logout</a></li>
                </ul>
               </div>
              </div>
             </nav>

             <div class="container">
              <div layout:fragment="content">
               <!-- Your Page Content Here -->
              </div>
             </div>

             <script th:src="@{'/assets/js/jquery-2.1.4.min.js'}"></script>
             <script th:src="@{'/assets/bootstrap/js/bootstrap.min.js'}"></script>

             <div class="footer">
              <h1>
               <a href="http://www.javaguides.net/p/spring-boot-tutorial.html">
                Spring Boot Tutorial</a>
              </h1>
             </div>

            </body>
            </html>
19. Thymeleaf Login View
This code creates the login form with the username and password fields and renders a login error if there is an error request parameter. The code configures the login form failureUrl to "/login?error", so if the users provide incorrect credentials, they will be redirected to the /login?error URL.
<!DOCTYPE html>
                <html xmlns="http://www.w3.org/1999/xhtml"
                 xmlns:th="http://www.thymeleaf.org"
                 xmlns:layout="http://www.ultraq.net.nz/thymeleaf/layout"
                 xmlns:sec="http://www.thymeleaf.org/thymeleaf-extras-springsecurity3"
                 layout:decorator="layout">
                <head>
                <title>Log in</title>
                </head>
                <body>
                 <div layout:fragment="content">
                  <div class="panel col-md-5">
                   <div class="panel panel-primary">
                    <div class="panel-heading">Login Form</div>
                    <div class="panel-body">
                     <form action="home" th:action="@{/login}" method="post">
                      <div class="form-group has-feedback">
                       <input type="email" class="form-control" name="username"
                        placeholder="Email" /> <span
                        class="glyphicon glyphicon-envelope form-control-feedback"></span>
                      </div>
                      <div class="form-group has-feedback">
                       <input type="password" class="form-control" name="password"
                        placeholder="Password" /> <span
                        class="glyphicon glyphicon-lock form-control-feedback"></span>
                      </div>
                      <div class="form-group">
                       <label>
                            <input type="checkbox" name="remember-me"> Remember Me
                          </label>
                      </div>
                      <div class="row">
                       <div class="form-group col-xs-offset-8 col-xs-4">
                        <button type="submit" class="btn btn-primary btn-block btn-flat"
                         th:text="#{label.login}">LogIn</button>
                       </div>
                      </div>
                      <div class="row">
                       <div class="col-xs-12">
                        <div th:if="${param.error}"
                         class="alert alert-danger alert-dismissable">
                         <p>
                          <i class="icon fa fa-ban"></i> <span
                           th:text="#{error.login_failed}">Invalid Email and
                           Password.</span>
                         </p>
                        </div>
                        <div th:if="${param.logout}"
                         class="alert alert-info alert-dismissable">
                         <p>
                          <i class="icon fa fa-info"></i> <span
                           th:text="#{info.logout_success}">You have been logged
                           out.</span>
                         </p>
                        </div>
                        <div th:if="${msg!=null}"
                         class="alert alert-warning alert-dismissable">
                         <p>
                          <i class="icon fa fa-warning"></i> <span th:text="${msg}"></span>
                         </p>
                        </div>
                       </div>
                      </div>
                     </form>
                    </div>
                   </div>
                  </div>
                 </div>
                </body>
                </html>
20. Thymeleaf Userhome View
The code configures "/home" as defaultSuccessUrl, so after successful authentication, users will be redirected to the /home URL, which will render the userhome.html view.
<!DOCTYPE html>
                <html xmlns="http://www.w3.org/1999/xhtml"
                 xmlns:th="http://www.thymeleaf.org"
                 xmlns:layout="http://www.ultraq.net.nz/thymeleaf/layout"
                 xmlns:sec="http://www.thymeleaf.org/thymeleaf-extras-springsecurity3"
                 layout:decorator="layout">
                <head>
                   <title>User Home</title>
                </head>
                <body>
                 <div layout:fragment="content">
                  <p>
                   Welcome <span sec:authentication="principal.username">User</span>
                  </p>
                  <p>
                   <a th:href="@{/logout}">Logout</a>
                  </p>
                  <div sec:authorize="hasRole('ROLE_ADMIN')">
                   <h3>You will see this only if you are ADMIN</h3>
                   <p>
                    <a th:href="@{/admin/home}">Admin Home</a>
                   </p>
                  </div>
                  <h3>Form with CSRF Token</h3>
                  <form th:action="@{/messages}" method="post">
                   <textarea name="content" cols="50" rows="5"></textarea>
                   <br>
                   <input type="submit" value="Submit" />
                  </form>
                  <div>
                  <br>
                   <div class="panel panel-default">
                    <div class="panel-heading">
                     Messages
                    </div>
                    <p th:each="msg: ${msgs}" th:text="${msg.content}"></p>
                   </div>
                  </div>
                 </div>
                </body>
                </html>
In the userhome.html view, you are using sec:authentication="principal.username to display the authenticated username. This example also conditionally renders the link to the admin’s home page only if the authenticated user has the role ROLE_ADMIN. This is done by using sec:authorize="hasRole ('ROLE_ADMIN').
The above file is our decorator for the content pages we will be creating in the application. The most important thing about the above example is layout:fragment="content. This is the heart of the decorator page (layout). You can also notice, that header and footer are included using Standard Thymeleaf Layout System.
Read more about thymeleaf layouts on https://www.thymeleaf.org/doc/articles/layouts.html
21. Thymeleaf Adminhome View
<!DOCTYPE html> <html xmlns="http://www.w3.org/1999/xhtml" xmlns:th="http://www.thymeleaf.org" xmlns:layout="http://www.ultraq.net.nz/thymeleaf/layout" xmlns:sec="http://www.thymeleaf.org/thymeleaf-extras-springsecurity3" layout:decorator="layout"> <head> <title>Admin Home</title> </head> <body> <div layout:fragment="content"> <p>Welcome Administrator(<span sec:authentication="principal.username">Admin</span>)</p> <p sec:authorize="isAuthenticated()"><a th:href="@{/logout}">Logout</a></p> </div> <h1>This is admin home page</h1> </body> </html>22. Index View
    <!DOCTYPE html>
    <html xmlns="http://www.w3.org/1999/xhtml"
       xmlns:th="http://www.thymeleaf.org"
       xmlns:layout="http://www.ultraq.net.nz/thymeleaf/layout"
       xmlns:sec="http://www.thymeleaf.org/thymeleaf-extras-springsecurity3"
       layout:decorator="layout">

        <head>
            <title>Home</title>
        </head>
        <body>
         <div layout:fragment="content">

           <p sec:authorize="isAnonymous()"><a th:href="@{/login}">Login</a></p>
              <p><a th:href="@{/home}">User Home</a></p>
           <p><a th:href="@{/admin/home}">Admin Home</a></p>
           <p sec:authorize="isAuthenticated()"><a th:href="@{/logout}">Logout</a></p>
         </div>
        </body>
    </html>
Before running this application, we need to initialize the database with some sample data for users and roles.
23. Sample data for Users and Roles - src/main/resources/data.sql
create table if not exists persistent_logins (
                username varchar(100) not null,
                series varchar(64) primary key,
                token varchar(64) not null,
                last_used timestamp not null
           );

           delete from  user_role;
           delete from  roles;
           delete from  users;

           INSERT INTO roles (id, name) VALUES
           (1, 'ROLE_ADMIN'),
           (2, 'ROLE_ACTUATOR'),
           (3, 'ROLE_USER');

           INSERT INTO users (id, email, password, name) VALUES
           (1, 'admin@gmail.com', '$2a$10$hKDVYxLefVHV/vtuPhWD3OigtRyOykRLDdUAp80Z1crSoS1lFqaFS', 'Admin'),
           (3, 'user@gmail.com', '$2a$10$ByIUiNaRfBKSV6urZoBBxe4UbJ/sS6u1ZaPORHF9AtNWAuVPVz1by', 'User');

           insert into user_role(user_id, role_id) values
           (1,1),
           (1,2),
           (1,3),
           (3,2);
The passwords are encrypted using the BCryptPasswordEncoder.encode(plan_tx_password) method.
24. Running Application
Two ways we can start the standalone Spring boot application.
1.From the root directory of the application and type the following command to run it -
$ mvn spring-boot:run
2.From your IDE, run the SpringbootThymeleafSecurityDemoApplication.main() method as a standalone Java class that will start the embedded Tomcat server on port 8080 and point the browser to http://localhost:8080/.
package net.javaguides.springbootsecurity;

            import org.springframework.boot.SpringApplication;
            import org.springframework.boot.autoconfigure.SpringBootApplication;

            @SpringBootApplication
            public class SpringbootThymeleafSecurityDemoApplication
            {
                 public static void main(String[] args)
                 {
                      SpringApplication.run(SpringbootThymeleafSecurityDemoApplication.class, args);
                 }
            }
25. Demo
After running this application, go to http://localhost:8080. You will be redirected to the index page:
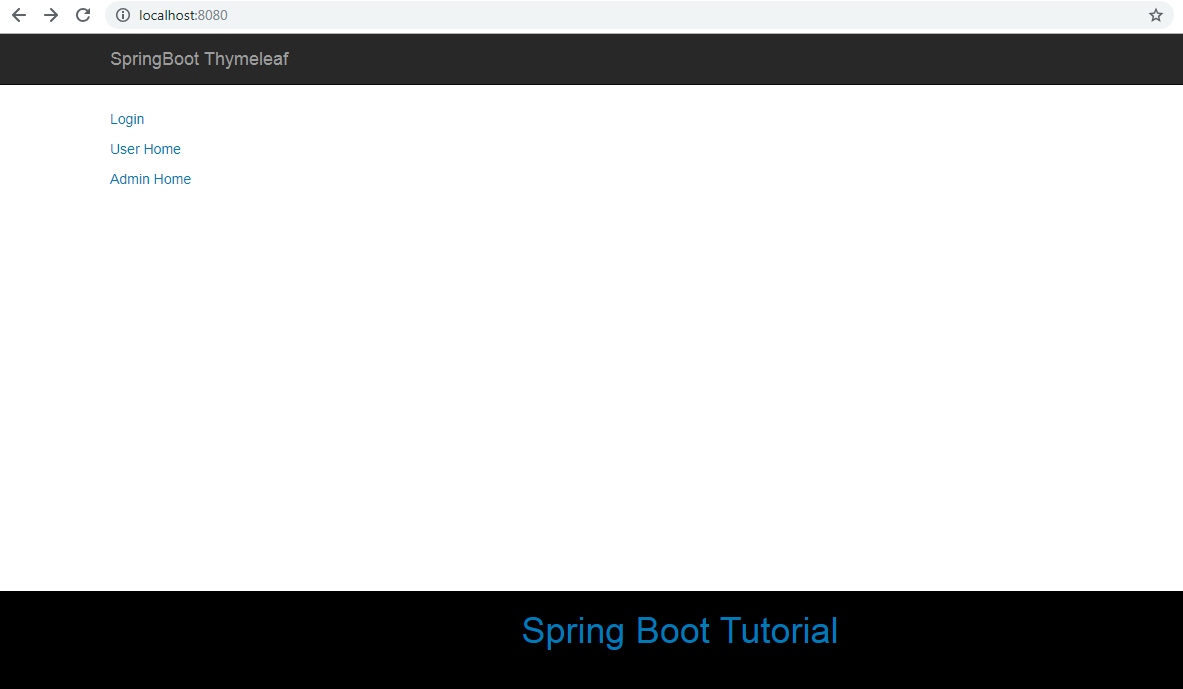
Click on any link will redirect to the login page:
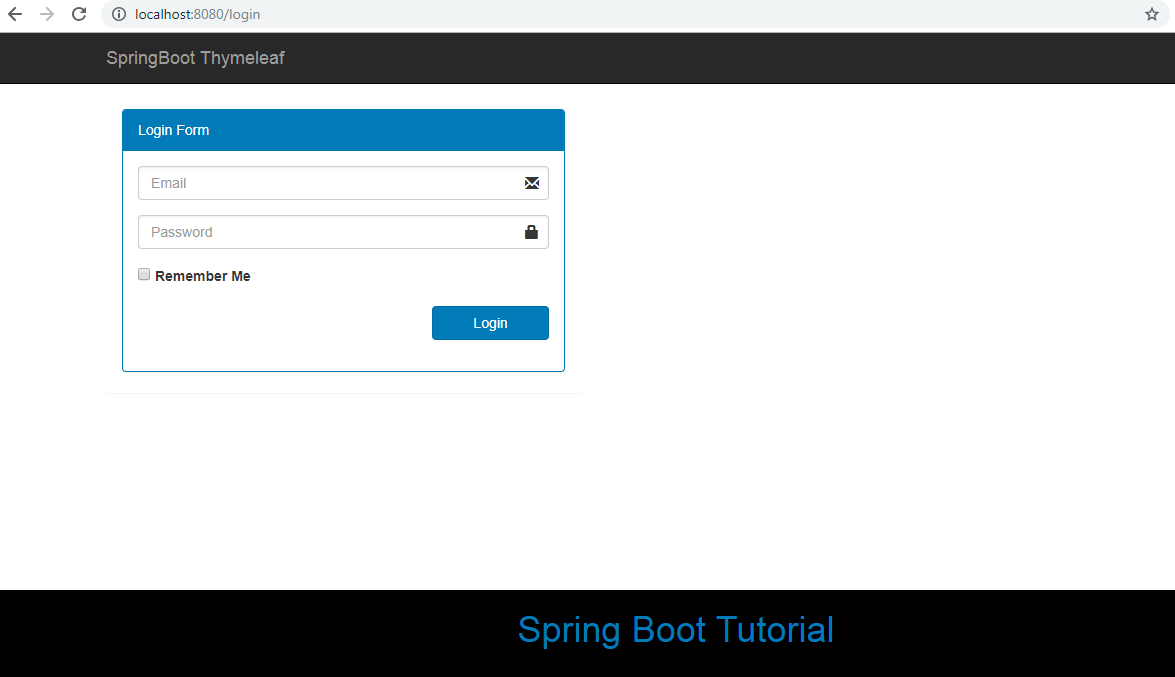
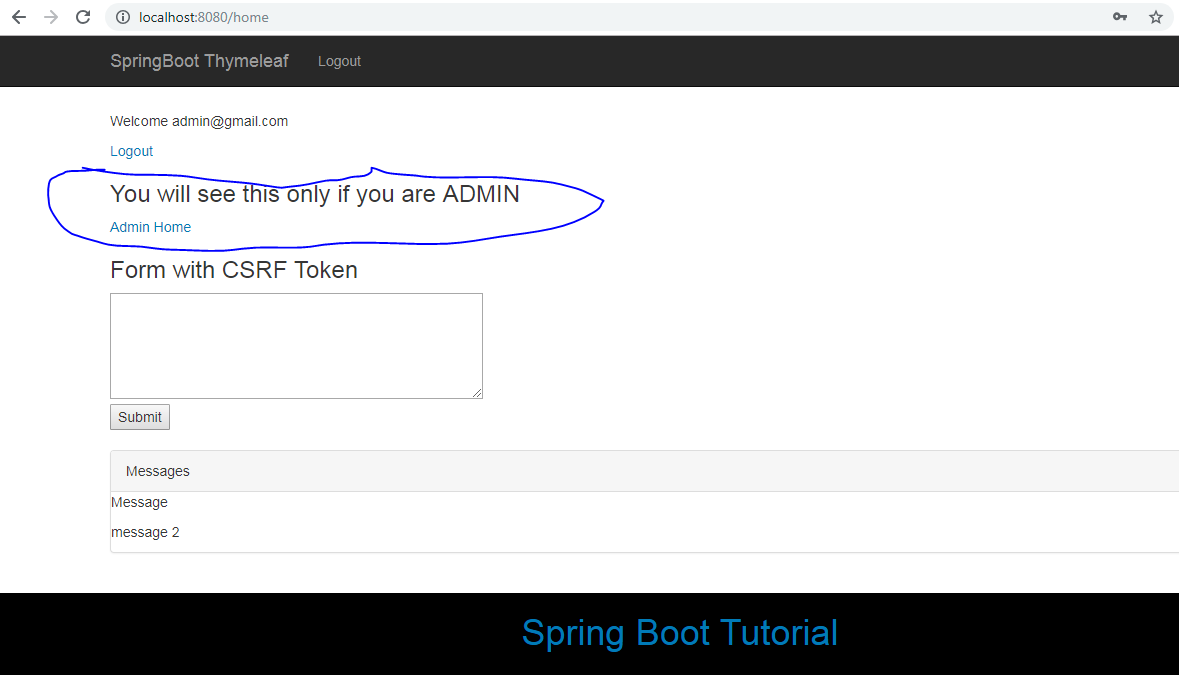
After submitting the valid credentials (such as admin@gmail.com/admin), you will be redirected to the home page. If you have logged in as a user with the ADMIN role, you should be able to see the text You will see this only if you are ADMIN and a link to Admin Home.
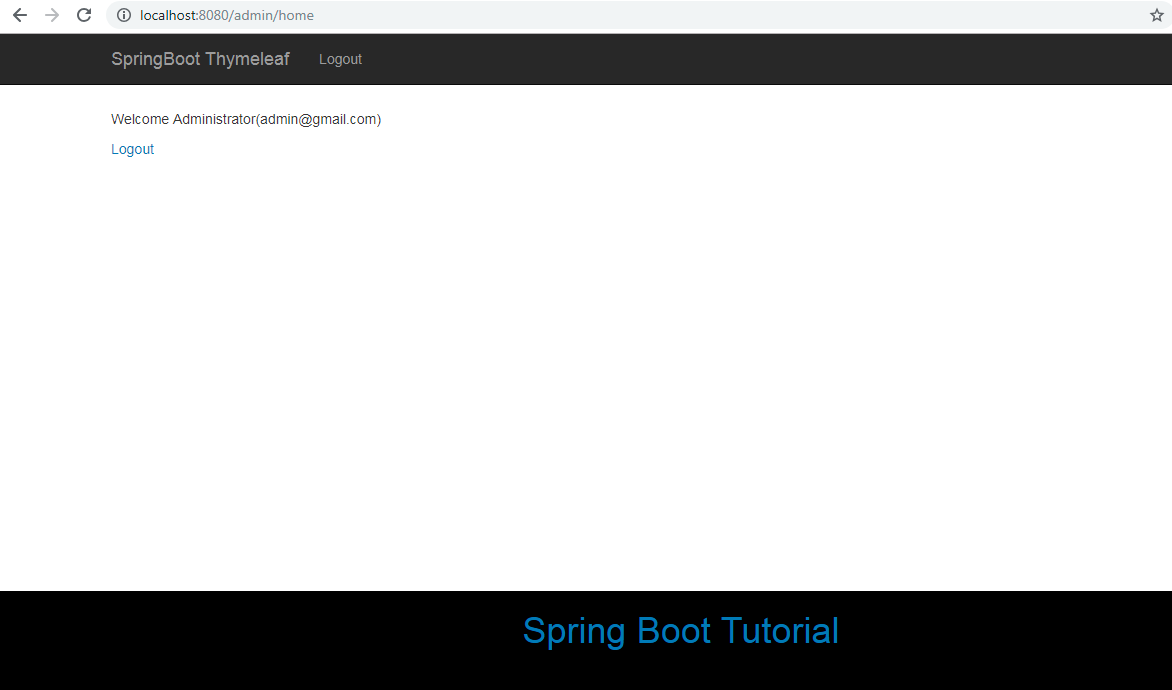
If you click on the Admin Home link, you should be able to see the Admin Homepage:
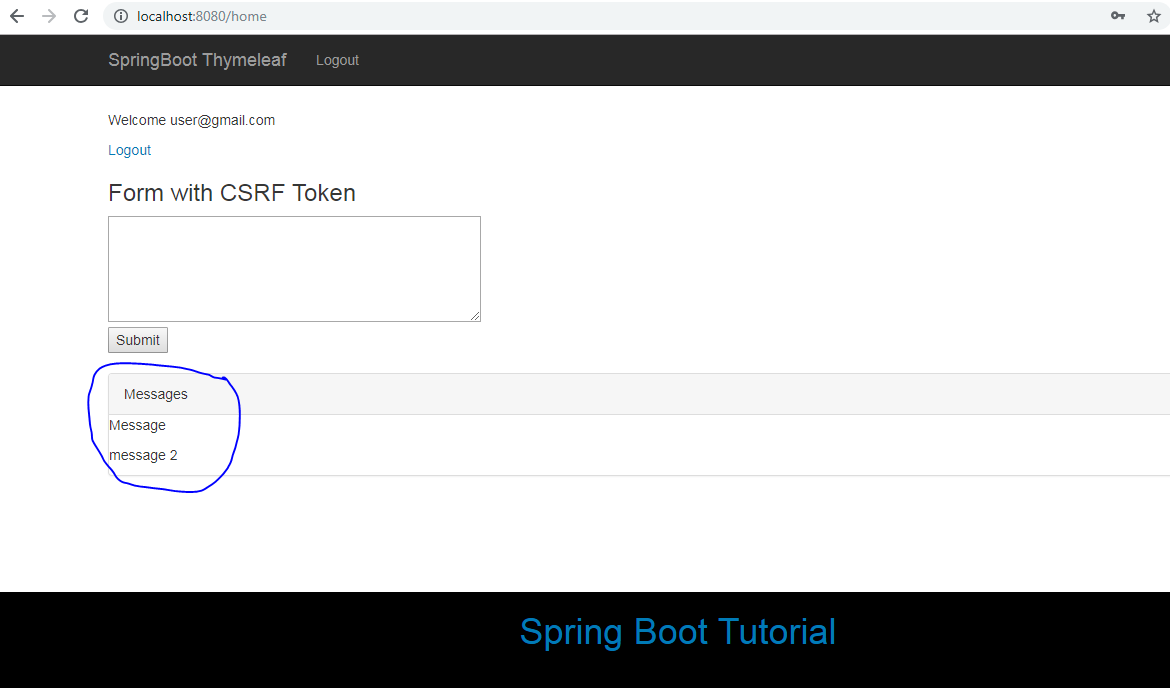
If you have logged in as a normal user (user@gmail.com/user), you will not be able to see You will see this only if you are ADMIN and a link to Admin Home. We create and list messages to and from the database.
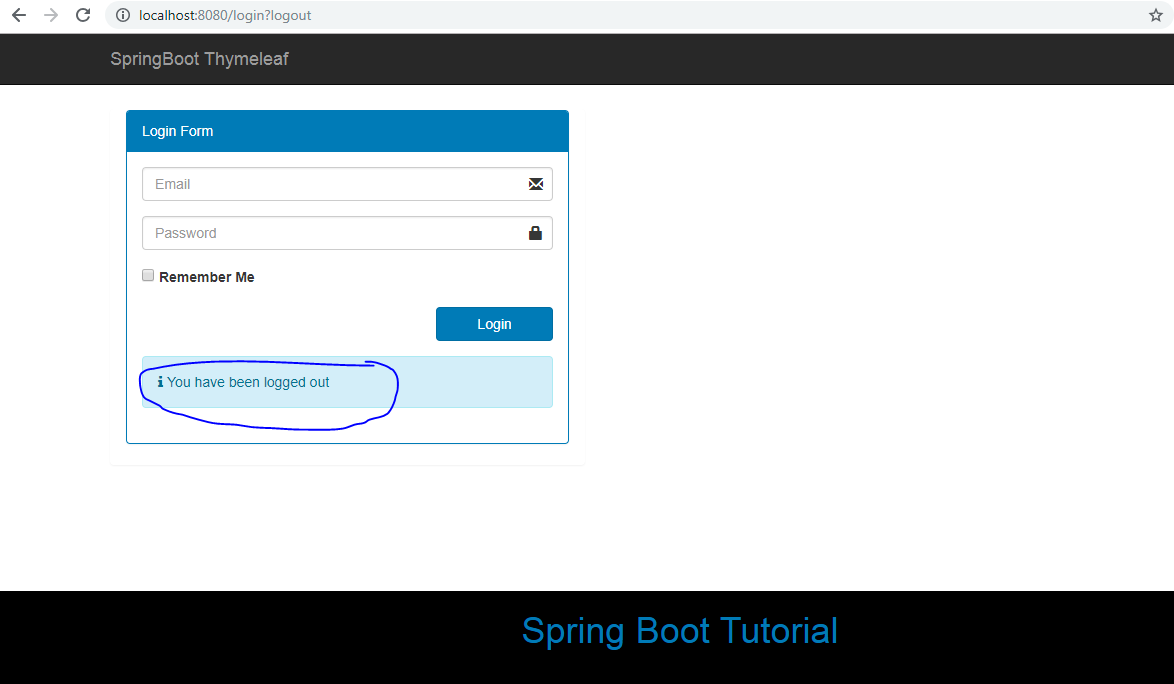
Click on the logout link will redirect to the login page with the proper message:
This is the end of the application flow and tutorial.