package net.javaguides.springboot;
import org.springframework.boot.SpringApplication;
import org.springframework.boot.autoconfigure.SpringBootApplication;
@SpringBootApplication
public class SpringbootRestApiApplication {
public static void main(String[] args) {
SpringApplication.run(SpringbootRestApiApplication.class, args);
}
} Spring Boot 3 Tutorial
Author: Sai K
In this tutorial, you will learn how to create Spring boot 3 projects and build step-by-step REST APIs
using Spring Boot 3.
Spring boot 3 required Java 17 or later so make that you have installed Java 17+ on your machine.
Table of Content
What's New in Spring Boot 3?
What is Spring Framework?
What is Spring Boot?
Learn to Build Spring Boot REST APIs
- Spring Boot Hello World REST API
- Build Spring Boot REST API returns Java Bean
- Build Spring Boot REST API returns List
- Spring Boot REST API with Path Variable
- Build Spring Boot REST API with Request Param
Develop Spring Boot CRUD REST APIs with Spring Boot 3, Spring Data JPA (Hibernate), and MySQL Database
- Build Create User REST API
- Build Get User REST API
- Build Get All Users REST API
- Build Update REST API
- Build Delete REST API
What's New in Spring Boot 3?
Highlights of the new Spring Boot 3.0 release include:
Java 17 Baseline and Java 19 Support: Spring Boot 3.0 requires Java 17 as a minimum version. If
you are currently using Java 8 or Java 11, you’ll need to upgrade your JDK before you can develop Spring
Boot 3.0 applications. Spring Boot 3.0 also works well and has been tested with JDK 19.
Third-party Library Upgrades: Spring Boot 3.0 builds on and requires Spring Framework 6. You might
like to read about the new features available in Spring Framework 6.0.
Spring Boot 3.0 has migrated from Java EE to Jakarta EE APIs for all dependencies. Spring boot 3.0
supports Jakarta EE 10 with a Jakarta EE 9 baseline.
Native Java compilation for GraalVM: Spring Boot 3 will also have out-of-the-box support for Native Java compilation for GraalVM.
A big change is that Spring Boot 3 will remove all deprecated features.
Improved observability with Micrometer and Micrometer Tracing
What is Spring Framework?
Spring is a very popular JavaEE framework for building web and enterprise applications.
If you are a Java developer then there is a high chance that you might have heard about the Spring
framework and probably have used it in your projects.
Spring is very popular for several reasons:
- Spring’s dependency injection approach encourages writing testable code
- Easy to use but powerful database transaction management capabilities
- Spring simplifies integration with other Java frameworks like JPA/Hibernate ORM, Struts/JSF/etc. web frameworks
- State-of-the-art Web MVC framework for building web applications
Basically, Spring-based applications have a lot of configurations. For example:
When we develop the Spring MVC web application using Spring MVC then we need to configure
- Component scan
- Dispatcher Servlet
- View resolver
- Web jars (for delivering static content)
When we use Hibernate/JPA in the same Spring MVC application then we would need to configure a
- Data source
- Entity manager factory/session factory
- Transaction manager among a host of other things.
When you use cache in the same Spring MVC application then we need to configure
- Cache configuration
When you use Message Queue in the same Spring MVC application then we need to configure
- Message queue configuration
When you use a NoSQL database in the same Spring MVC application then we need to configure
- NoSQL database configuration
A lot of configuration right.
If Spring can automatically do it for me that would be awesome!!!.
Well, Spring Boot does what exactly you are looking for. It will do things automatically for you but
allows you to override the defaults if you want to.
The Spring team created Spring Boot to address the complexity of the configuration.
What is Spring Boot?
Spring Boot is basically an extension of the Spring framework which eliminated the boilerplate
configurations required for setting up a Spring application.
Spring Boot is an opinionated framework that helps developers build Spring-based applications quickly
and easily. The main goal of Spring Boot is to quickly create Spring-based applications without
requiring developers to write the same boilerplate configuration again and again.
Next, let's create a Spring boot application step by step and build a few REST APIs.
1. Creating Spring Boot Application using Spring Initializr
Spring Boot provides a web tool called https://start.spring.io/ to bootstrap an application quickly. Just go to https://start.spring.io/ and generate a new spring boot project.
Use the below details in the Spring boot creation:
Project Name: springboot-rest-api
Project Type: Maven
Choose dependencies: Spring Web
Package name: net.ssclabs.springboot
Java: 17
Packaging: Jar
Note: Spring boot 3 required Java 17 or later so make that you choose Java 17+.
Refer to below complete pom.xml for your reference:
<?xml version="1.0" encoding="UTF-8"?>
<project xmlns="http://maven.apache.org/POM/4.0.0" xmlns:xsi="http://www.w3.org/2001/XMLSchema-instance"
xsi:schemaLocation="http://maven.apache.org/POM/4.0.0 https://maven.apache.org/xsd/maven-4.0.0.xsd">
<modelVersion>4.0.0</modelVersion>
<parent>
<groupId>org.springframework.boot</groupId>
<artifactId>spring-boot-starter-parent</artifactId>
<version>3.0.0-M4</version>
<relativePath/> <!-- lookup parent from repository -->
</parent>
<groupId>net.javaguides</groupId>
<artifactId>springboot-rest-api</artifactId>
<version>0.0.1-SNAPSHOT</version>
<name>springboot-rest-api</name>
<description>Demo project for Spring Boot REST API</description>
<properties>
<java.version>17</java.version>
</properties>
<dependencies>
<dependency>
<groupId>org.springframework.boot</groupId>
<artifactId>spring-boot-starter-web</artifactId>
</dependency>
<dependency>
<groupId>org.springframework.boot</groupId>
<artifactId>spring-boot-starter-test</artifactId>
<scope>test</scope>
</dependency>
</dependencies>
<build>
<plugins>
<plugin>
<groupId>org.springframework.boot</groupId>
<artifactId>spring-boot-maven-plugin</artifactId>
</plugin>
</plugins>
</build>
<repositories>
<repository>
<id>spring-milestones</id>
<name>Spring Milestones</name>
<url>https://repo.spring.io/milestone</url>
<snapshots>
<enabled>false</enabled>
</snapshots>
</repository>
</repositories>
<pluginRepositories>
<pluginRepository>
<id>spring-milestones</id>
<name>Spring Milestones</name>
<url>https://repo.spring.io/milestone</url>
<snapshots>
<enabled>false</enabled>
</snapshots>
</pluginRepository>
</pluginRepositories>
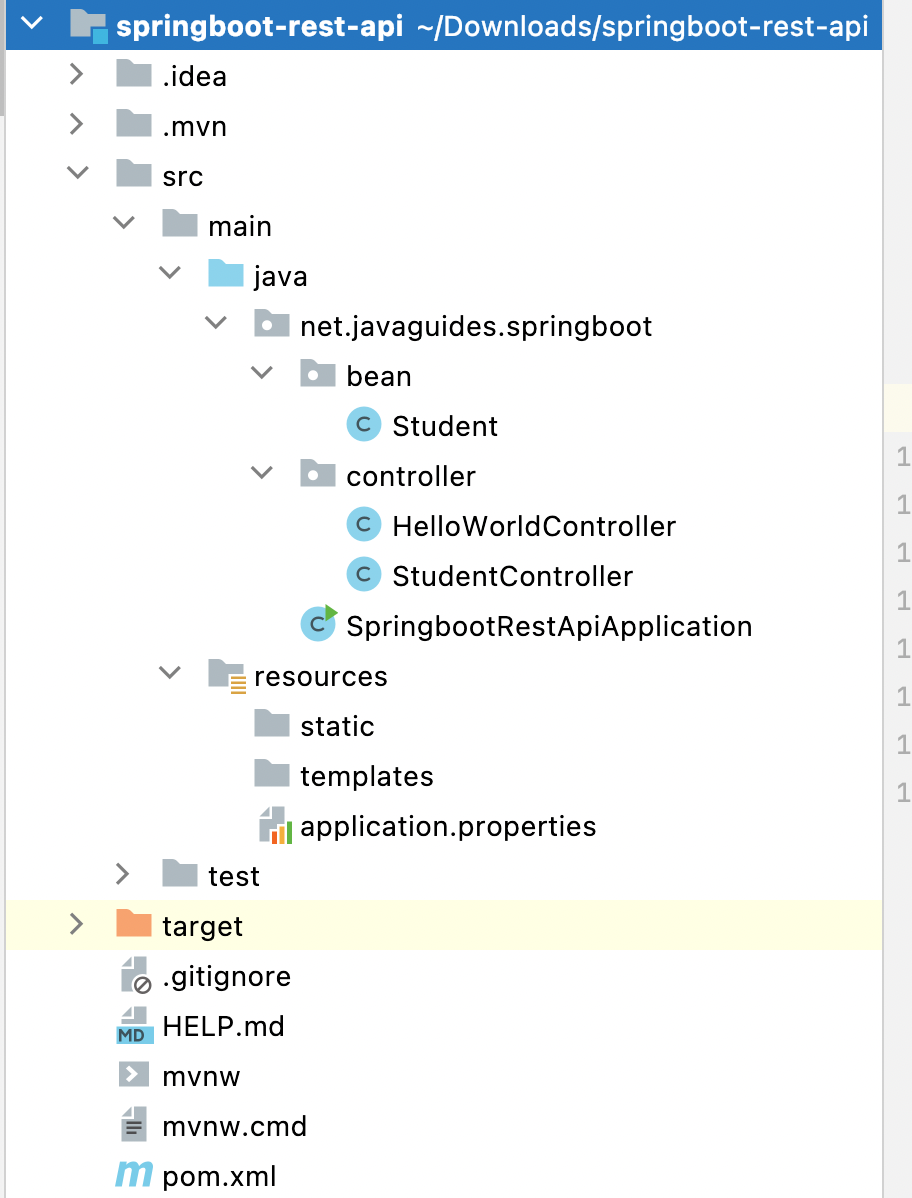
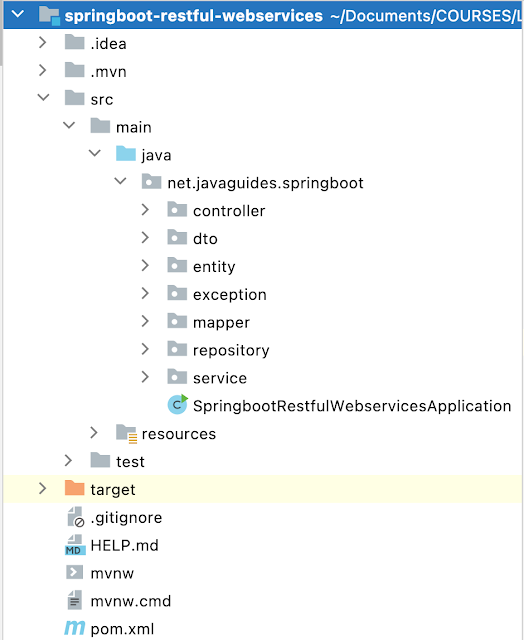
</project> Project Structure
Create the packaging or project structure as per the below screenshot:
Learn to Build Spring Boot REST APIs
1. Spring Boot Hello World REST API
Within the controller package, let's create a HelloWorldController class and the below code to it:
package net.javaguides.springboot.controller;
import org.springframework.web.bind.annotation.GetMapping;
import org.springframework.web.bind.annotation.RestController;
@RestController
public class HelloWorldController {
// HTTP GET Request
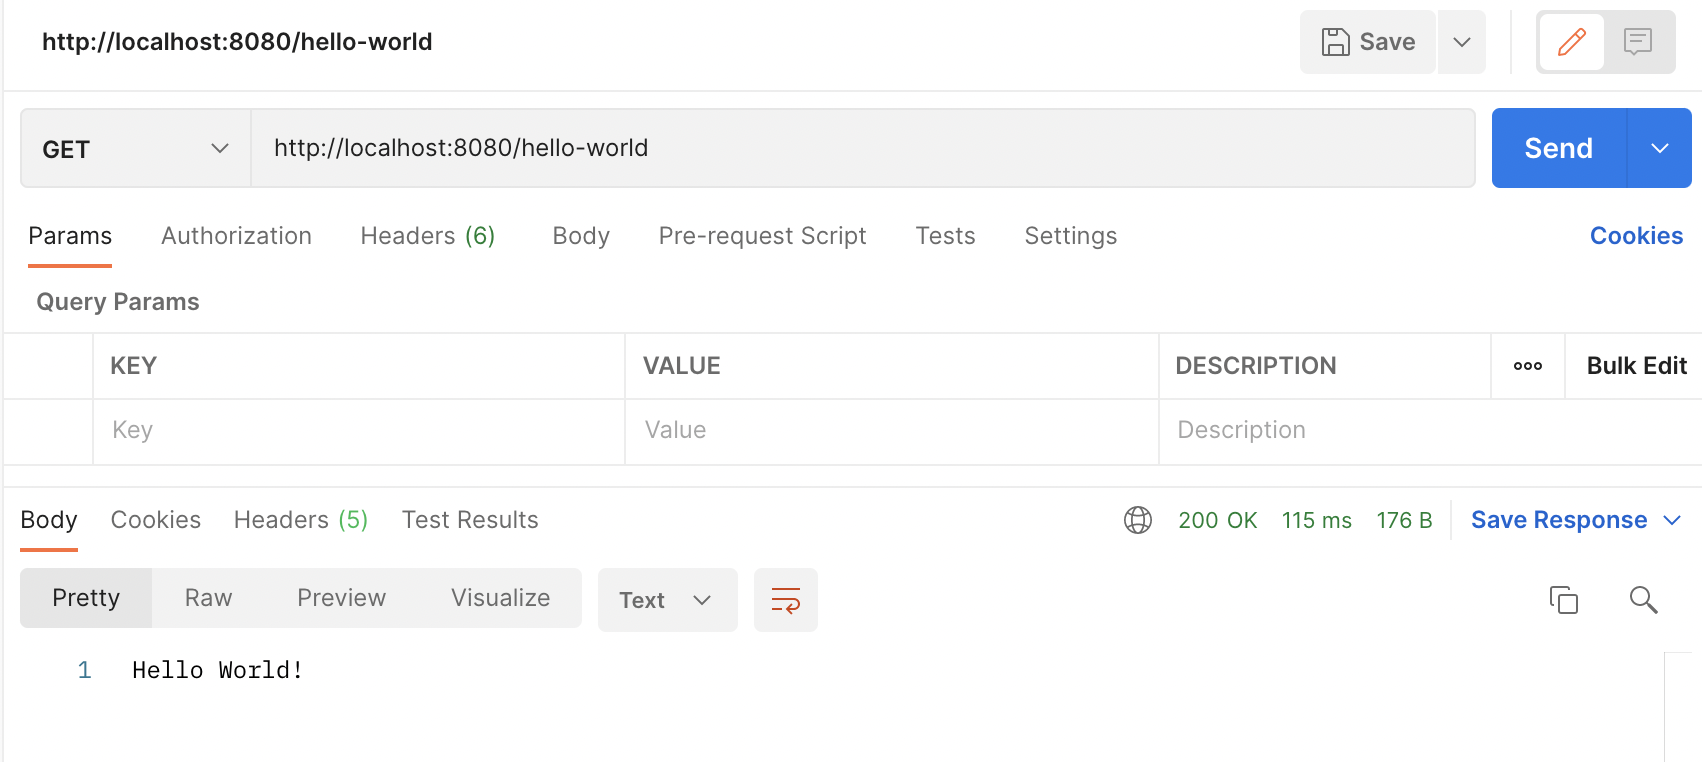
// http://localhost:8080/hello-world
@GetMapping("/hello-world")
public String helloWorld(){
return "Hello World!";
}
} - The above code uses Spring 4’s new @RestController annotation, which marks the class as a controller where every method returns a domain object instead of a view. It’s shorthand for @Controller and @ResponseBody rolled together.
- @GetMapping annotation for mapping HTTP GET requests onto specific handler methods. Specifically, @GetMapping is a composed annotation that acts as a shortcut for @RequestMapping(method = RequestMethod.GET).
Run and Test Spring Boot Application:
The below class SpringbootRestApiApplication is the entry point that sets up the Spring Boot application. The @SpringBootApplication annotation enables auto-configuration and component scanning.
Run the spring boot application from IDE:
From your IDE, run theSpringbootRestApiApplication.main() method as a standalone Java class that will start the embedded Tomcat server on port 8080 and point the browser tohttp://localhost:8080/.
Run the spring boot application using the command line:
Just go to the root directory of the application and type the following command to run it -
$ mvn spring-boot:run
The application will start at Spring Boot’s default tomcat port 8080.
Test Spring boot REST API using Postman client:
2. Build Spring Boot REST API returns Java Bean
In this section, we will build a simple Spring boot REST API that returns Java bean as JSON to the
client.
Let's first create a Student java bean class that the REST API wants to return to
the client:
package com.springboot.first.app;

public class Student {
	private String firstName;
	private String lastName;

	public Student(String firstName, String lastName) {
		super();
		this.firstName = firstName;
		this.lastName = lastName;
	}

	public String getFirstName() {
		return firstName;
	}
	public void setFirstName(String firstName) {
		this.firstName = firstName;
	}
	public String getLastName() {
		return lastName;
	}
	public void setLastName(String lastName) {
		this.lastName = lastName;
	}
}
Let's create the StudentController class and the below code to it:
import org.springframework.web.bind.annotation.GetMapping;
import org.springframework.web.bind.annotation.RestController;

@RestController
public class StudentController {

	// http://localhost:8080/student
	@GetMapping("/student")
	public Student getStudent() {
		return new Student("Ramesh", "Fadatare");
	}
}- The above code uses Spring 4’s new@RestController annotation, which marks the class as a controller where every method returns a domain object instead of a view. It’s shorthand for@Controller and @ResponseBody rolled together.
- @GetMapping annotation for mapping HTTP GET requests onto specific handler methods. Specifically, @GetMapping is a composed annotation that acts as a shortcut for @RequestMapping(method = RequestMethod.GET).
- TheStudent object must be converted to JSON. Thanks to Spring’s HTTP message converter support, you don’t need to do this conversion manually. Because Jackson 2 is on the classpath, Spring’s MappingJackson2HttpMessageConverter is automatically chosen to convert theStudentinstance to JSON.
Run spring boot application from the IDE:
package com.springboot.first.app;

import org.springframework.boot.SpringApplication;
import org.springframework.boot.autoconfigure.SpringBootApplication;

@SpringBootApplication
public class SpringbootFirstAppApplication {
	public static void main(String[] args) {
		SpringApplication.run(SpringbootFirstAppApplication.class, args);
	}
}
From your IDE, run the SpringbootFirstAppApplication.main() method as a standalone Java class
that will start the embedded Tomcat server on port 8080 and point the browser tohttp://localhost:8080/".
Just hit this link in a browser:http://localhost:8080/student.
You will able to see the response of this REST API in the browser.
3. Build Spring Boot REST API returns List
In this section, we will build a simple Spring boot REST API that returns the List object as JSON to the
client.
Let's open theStudentController, class and the below code to it:
import java.util.ArrayList;
import java.util.List;

import org.springframework.web.bind.annotation.GetMapping;
import org.springframework.web.bind.annotation.RestController;

@RestController
public class StudentController {

	@GetMapping("/students")
	public List< Student> getStudents(){
		List< Student> students = new ArrayList<>();
		students.add(new Student("Ramesh", "Fadatare"));
		students.add(new Student("Tony", "Cena"));
		students.add(new Student("Sanjay", "Jadhav"));
		students.add(new Student("Ram", "Jadhav"));
		students.add(new Student("Umesh", "Fadatare"));
		return students;
	}
}- The above code uses Spring 4’s new @RestController annotation, which marks the class as a controller where every method returns a domain object instead of a view. It’s shorthand for@Controller and @ResponseBody rolled together.
- @GetMapping annotation for mapping HTTP GET requests onto specific handler methods. Specifically, @GetMapping is a composed annotation that acts as a shortcut for@RequestMapping(method = RequestMethod.GET).
- The List of student objects must be converted to JSON. Thanks to Spring’s HTTP message converter support, you don’t need to do this conversion manually. Because Jackson 2 is on the classpath, Spring’sMappingJackson2HttpMessageConverter is automatically chosen to convert the List of student objects to JSON.
Run spring boot application from the IDE:
From your IDE, run theSpringbootFirstAppApplication.main() method as a standalone Java class
that will start the embedded Tomcat server on port 8080 and point the browser tohttp://localhost:8080/.
Just hit this link in a browser:http://localhost:8080/students.
You will able to see the response of this REST API in the browser.
4. Spring Boot REST API with Path Variable
In this section, we will build a simple Spring boot REST API to demonstrate the usage of
@PathVariable annotation.
Let's open theStudentController class and the below code to it:
import org.springframework.web.bind.annotation.GetMapping;
import org.springframework.web.bind.annotation.PathVariable;
import org.springframework.web.bind.annotation.RestController;

@RestController
public class StudentController {

	// http://localhost:8080/student/1
	// @PathVariable annotation
	@GetMapping("/student/{firstName}/{lastName}/")
	public Student studentPathVariable(@PathVariable("firstName") String firstName,
			@PathVariable("lastName") String lastName) {
		return new Student(firstName, lastName);
	}
}- The above code uses Spring 4’s new@RestController annotation, which marks the class as a controller where every method returns a domain object instead of a view. It’s shorthand for @Controller and@ResponseBody rolled together.
- @GetMapping annotation for mapping HTTP GET requests onto specific handler methods. Specifically, @GetMapping is a composed annotation that acts as a shortcut for@RequestMapping(method = RequestMethod.GET).
- The Student object must be converted to JSON. Thanks to Spring’s HTTP message converter support, you don’t need to do this conversion manually. Because Jackson 2 is on the classpath, Spring’s MappingJackson2HttpMessageConverter is automatically chosen to convert the Student object to JSON.
- With the @PathVariable annotation, we bind the request URL template path variable to the method variable. For instance, with the /Ramesh/Fadatare/ URL, the "Ramesh" value is bound to the firstName variable and the "Fadatare" value to the lastName variable.
Run spring boot application from the IDE:
From your IDE, run theSpringbootFirstAppApplication.main() method as a standalone Java class
that will start the embedded Tomcat server on port 8080 and point the browser tohttp://localhost:8080/.
Just hit this link in a browser:http://localhost:8080/student/Ramesh/Fadatare.
You will be able to see the response of this REST API in the browser.
5. Build Spring Boot REST API with Request Param
In this section, we will build a simple Spring boot REST API that handles request or query parameters in the
GET HTTP request.
In this example, we use the@RequestParam annotation to extract query parameters from the HTTP
GET request.
Let's open theStudentController class and the below code to it:
import org.springframework.web.bind.annotation.GetMapping;
import org.springframework.web.bind.annotation.RequestParam;
import org.springframework.web.bind.annotation.RestController;

@RestController
public class StudentController {
	// build rest API to handle query parameters
	// http://localhost:8080/student/query?firstName=Ramesh&lastName=Fadatare
	@GetMapping("/student/query")
	public Student studentQueryParam(
			@RequestParam(name = "firstName") String firstName,
			@RequestParam(name = "lastName") String lastName) {
		return new Student(firstName, lastName);
	}
}- The above code uses Spring 4’s new@RestController annotation, which marks the class as a controller where every method returns a domain object instead of a view. It’s shorthand for@Controller and@ResponseBody rolled together.
- @GetMapping annotation for mapping HTTP GET requests onto specific handler methods. Specifically, @GetMapping is a composed annotation that acts as a shortcut for @RequestMapping(method = RequestMethod.GET) .
- TheStudent object must be converted to JSON. Thanks to Spring’s HTTP message converter support, you don’t need to do this conversion manually. Because Jackson 2 is on the classpath, Spring’sMappingJackson2HttpMessageConverter is automatically chosen to convert theStudent object to JSON.
- With the@RequestParam annotation, we extract query parameters from the HTTP GET request.
Develop Spring Boot CRUD REST APIs with Spring Boot 3, Spring Data JPA (Hibernate), and MySQL Database
In this section, we will learn how to build CRUD RESTful Webservices using Spring Boot 3, Spring Data JPA (Hibernate), and MySQL database.
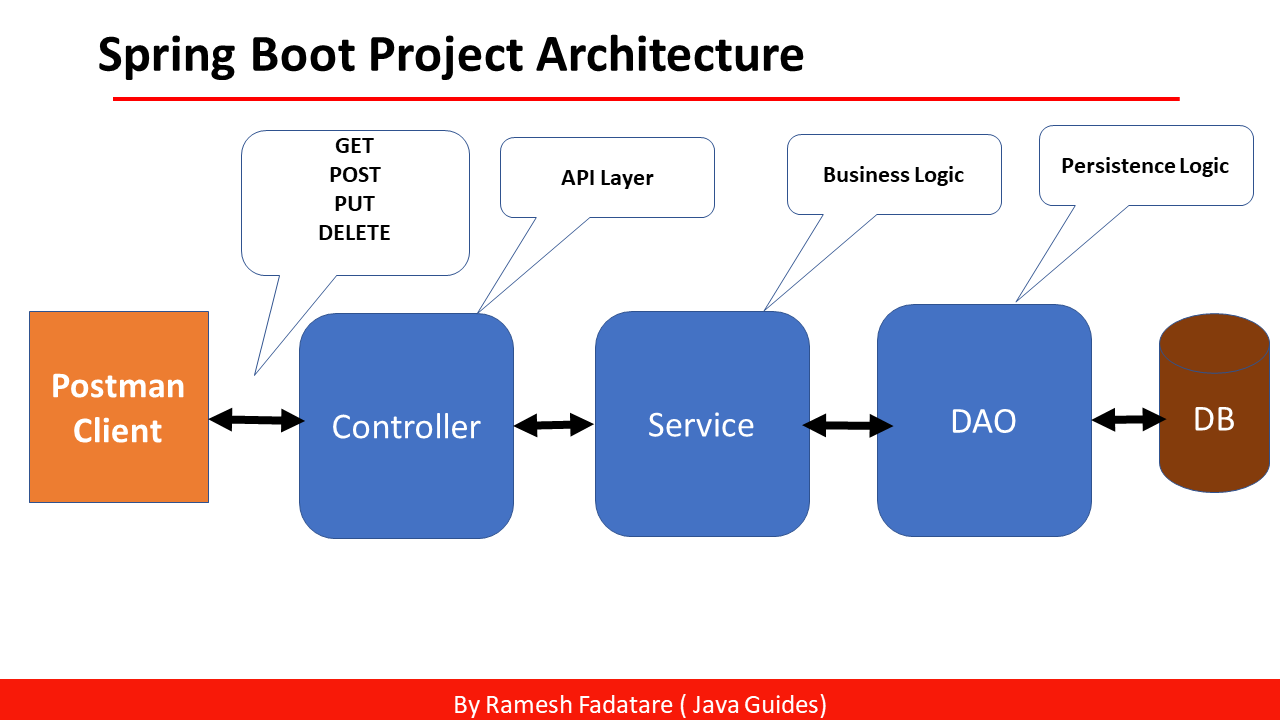
Spring Boot Project Architecture
We are going to use three-layer architecture in our Spring boot project:
Tools and Technologies Used:
- Spring Boot 3.0
- Java 17
- Spring Data JPA
- Hibernate
- MySQL Database
- Maven
- Postman
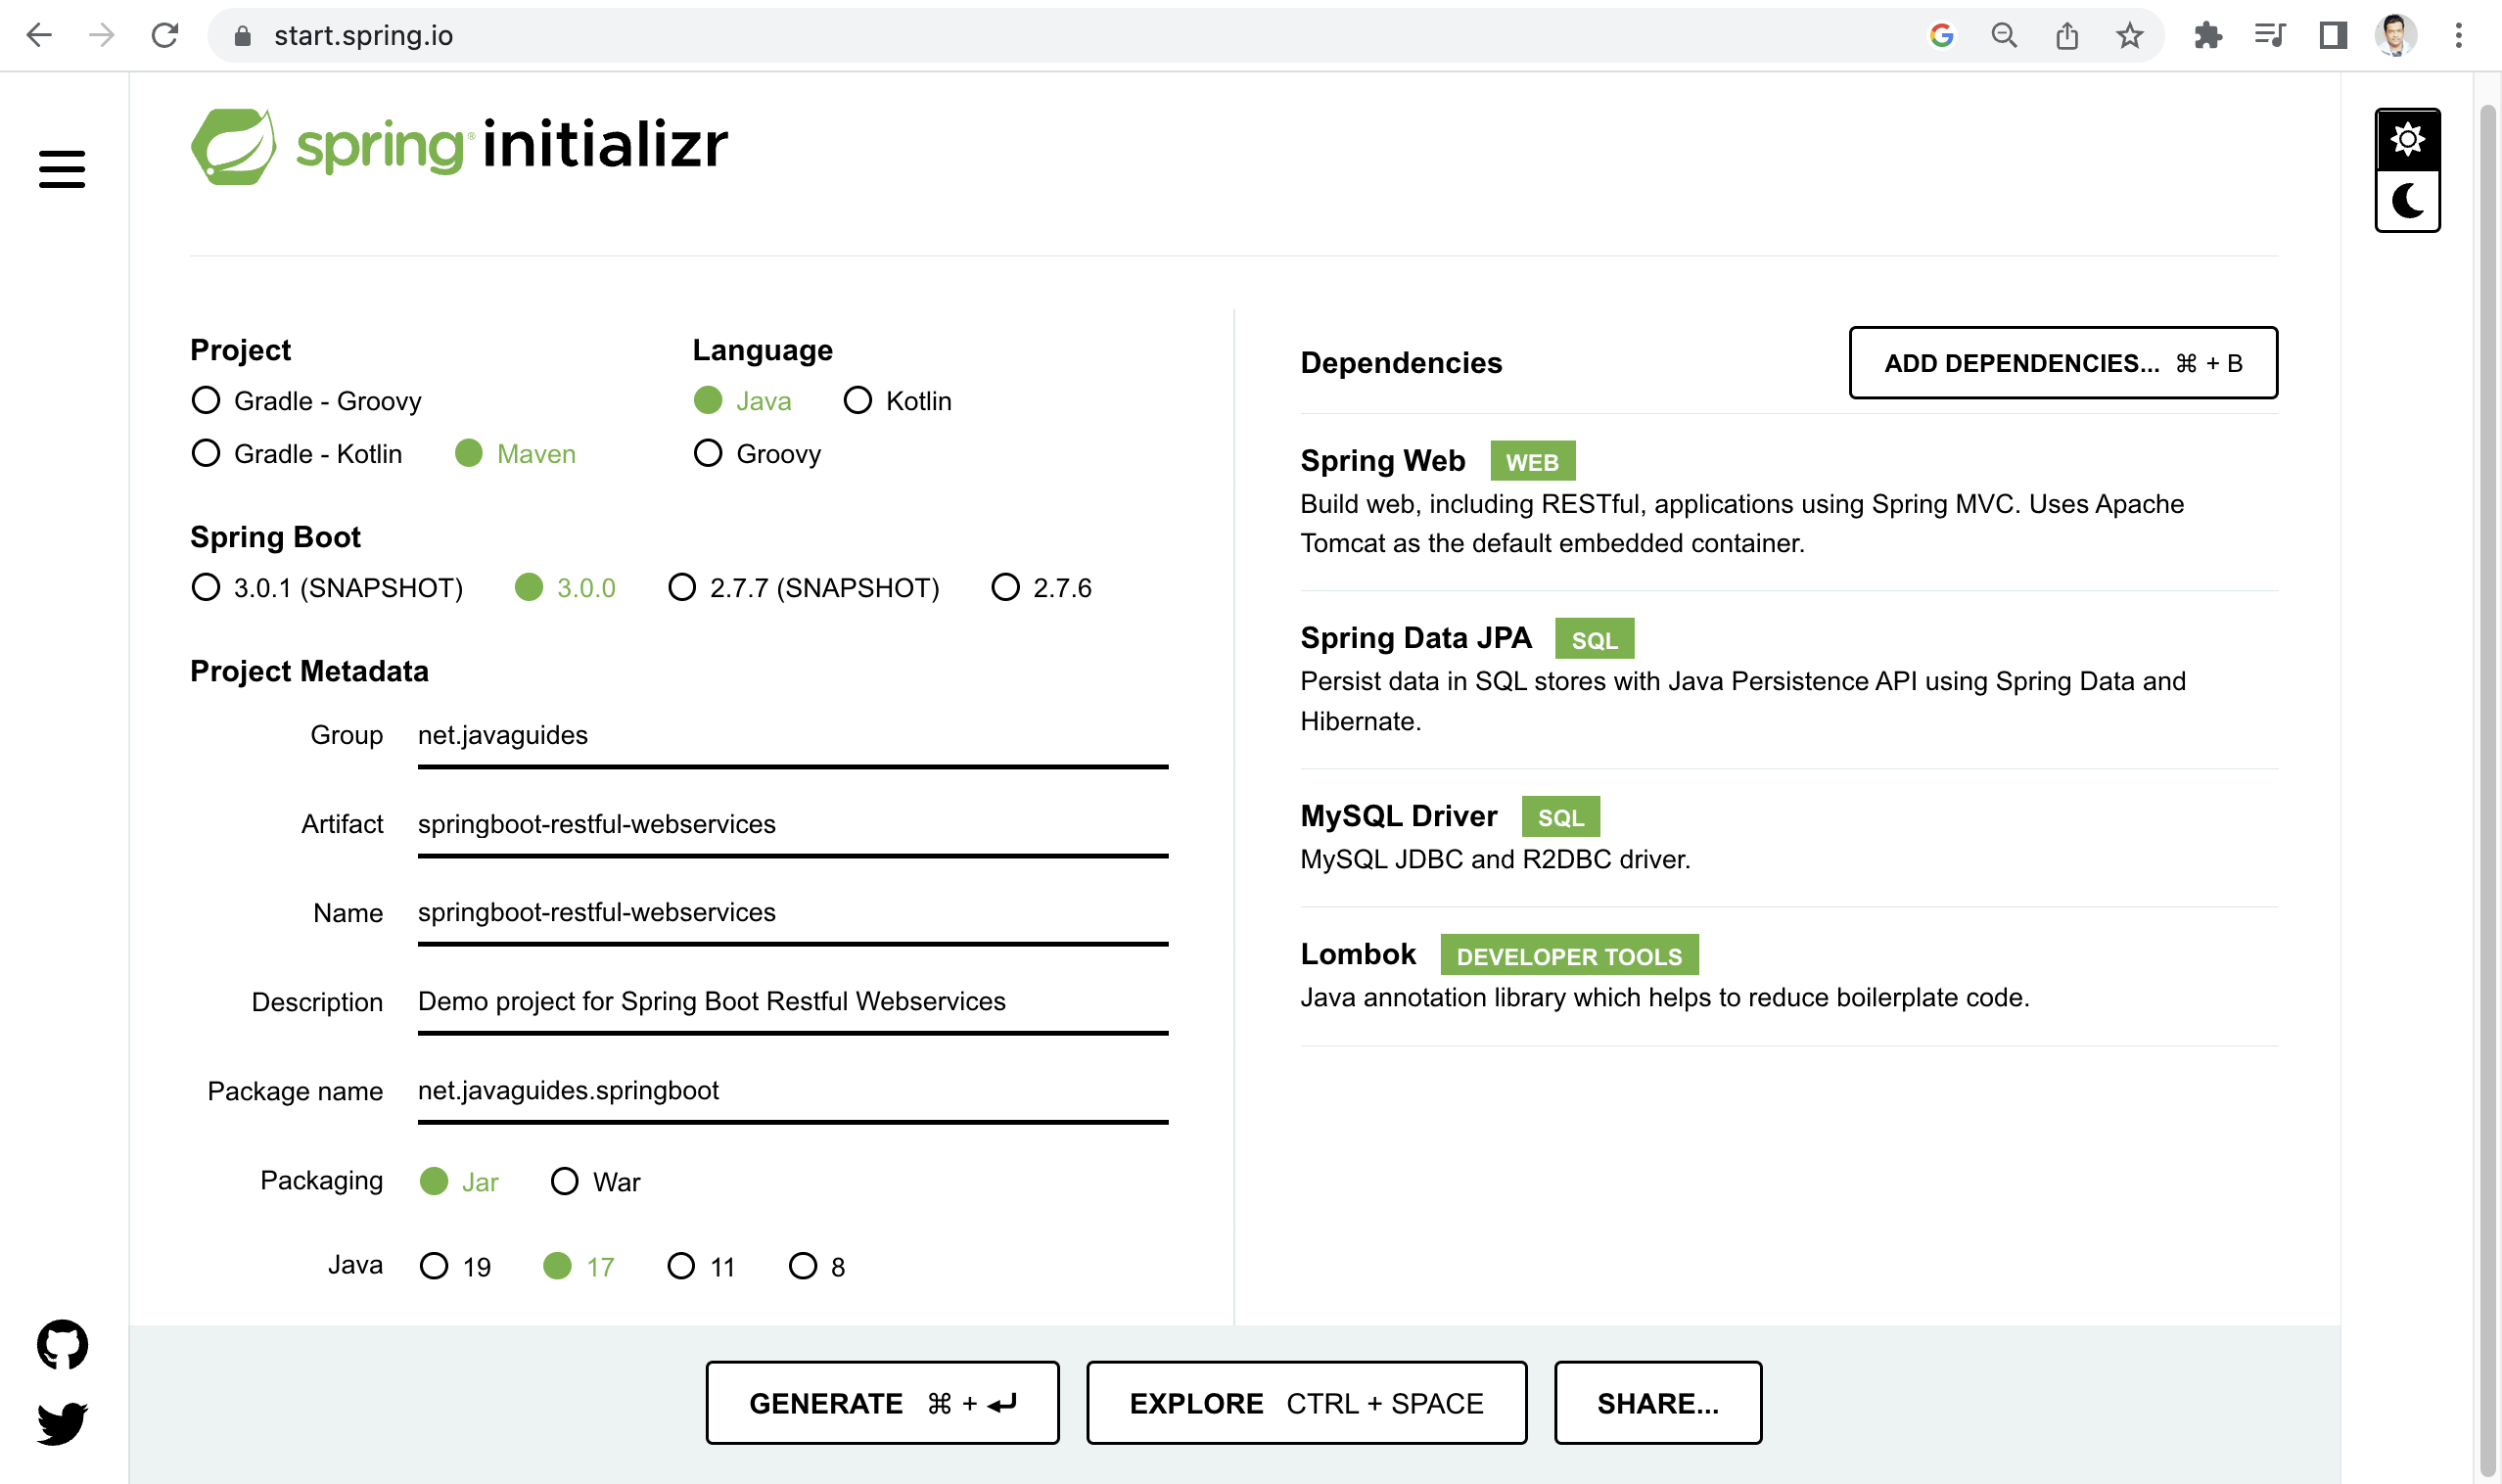
1. Create and Setup Spring Boot Project in IntelliJ
Spring Boot provides a web tool called Spring Initializer to create
and bootstrap Spring boot applications quickly. Just go to https://start.spring.io/" and generate a new spring boot
project.
Refer to this screenshot to enter the details to create the Spring Boot project:
Here is the pom.xml file for your reference:
<?xml version="1.0" encoding="UTF-8"?>
<project xmlns="http://maven.apache.org/POM/4.0.0"
         xmlns:xsi="http://www.w3.org/2001/XMLSchema-instance"
         xsi:schemaLocation="http://maven.apache.org/POM/4.0.0
         https://maven.apache.org/xsd/maven-4.0.0.xsd">
    <modelVersion>4.0.0</modelVersion>
    <parent>
        <groupId>org.springframework.boot</groupId>
        <artifactId>spring-boot-starter-parent</artifactId>
        <version>3.0.0</version>
        <relativePath/> <!-- lookup parent from repository -->
    </parent>
    <groupId>net.javaguides</groupId>
    <artifactId>springboot-restful-webservices</artifactId>
    <version>0.0.1-SNAPSHOT</version>
    <name>springboot-restful-webservices</name>
    <description>Demo project for Spring Boot Restful Webservices</description>
    <properties>
        <java.version>17</java.version>
    </properties>
    <dependencies>
        <dependency>
            <groupId>org.springframework.boot</groupId>
            <artifactId>spring-boot-starter-data-jpa</artifactId>
        </dependency>
        <dependency>
            <groupId>org.springframework.boot</groupId>
            <artifactId>spring-boot-starter-web</artifactId>
        </dependency>
        <dependency>
            <groupId>com.mysql</groupId>
            <artifactId>mysql-connector-j</artifactId>
            <scope>runtime</scope>
        </dependency>
        <dependency>
            <groupId>org.projectlombok</groupId>
            <artifactId>lombok</artifactId>
            <optional>true</optional>
        </dependency>
        <dependency>
            <groupId>org.springframework.boot</groupId>
            <artifactId>spring-boot-starter-test</artifactId>
            <scope>test</scope>
        </dependency>
    </dependencies>
    <build>
        <plugins>
            <plugin>
                <groupId>org.springframework.boot</groupId>
                <artifactId>spring-boot-maven-plugin</artifactId>
                <configuration>
                    <excludes>
                        <exclude>
                            <groupId>org.projectlombok</groupId>
                            <artifactId>lombok</artifactId>
                        </exclude>
                    </excludes>
                </configuration>
            </plugin>
        </plugins>
    </build>
</project>
Project Structure
Refer to this screenshot to create a project structure:
Configure MySQL Database
Let's first create a database, go to MySQL workbench, and use the below SQL query to create a new database:
create database user_management
Next, open the application.properties file and add the following properties to it.
spring.datasource.url=jdbc:mysql://localhost:3306/user_management
spring.datasource.username=root
spring.datasource.password=Mysql@123

spring.jpa.properties.hibernate.dialect=org.hibernate.dialect.MySQLDialect
spring.jpa.hibernate.ddl-auto=update
Make sure that you change the spring.datasource.username
&spring.datasource.password properties as per your MySQL installation.
In the above properties file, the last two properties are for Hibernate. Spring Boot uses Hibernate as
the default JPA implementation.
The property spring.jpa.hibernate.ddl-auto is used for database initialization. I’ve used the
value “update” for this property to create the database tables automatically.
Create User JPA Entity
Let's create a User class and add the following content to it:
package net.javaguides.springboot.entity;

import jakarta.persistence.*;
import lombok.AllArgsConstructor;
import lombok.Getter;
import lombok.NoArgsConstructor;
import lombok.Setter;

@Getter
@Setter
@NoArgsConstructor
@AllArgsConstructor
@Entity
@Table(name = "users")
public class User {

    @Id
    @GeneratedValue(strategy = GenerationType.IDENTITY)
    private Long id;
    @Column(nullable = false)
    private String firstName;
    @Column(nullable = false)
    private String lastName;
    @Column(nullable = false, unique = true)
    private String email;
}
Note that we are using Lombok annotations to reduce the boilerplate code (getters/setters).
Create Spring Data JPA Repository - UserRepository
Let's create a UserRepository interface that extends JpaRepository:
package net.javaguides.springboot.repository;

import net.javaguides.springboot.entity.User;
import org.springframework.data.jpa.repository.JpaRepository;

public interface UserRepository extends JpaRepository {

}
Note that we no need to add @Repository annotation because Spring Data JPA internally takes care of it.
Create Service Layer
Let's implement the service layer, we will first create an interface and then its implementation class.
Service Interface
Let's create an UserService interface and declare the following CRUD methods:
package net.javaguides.springboot.service;

import net.javaguides.springboot.entity.User;

import java.util.List;

public interface UserService {
    User createUser(User user);

    User getUserById(Long userId);

    List< User> getAllUsers();

    User updateUser(User user);

    void deleteUser(Long userId);
}
UserServiceImpl
Let's create UserServiceImpl class that implements UserService interface methods:
package net.javaguides.springboot.service.impl;

import lombok.AllArgsConstructor;
import net.javaguides.springboot.entity.User;
import net.javaguides.springboot.repository.UserRepository;
import net.javaguides.springboot.service.UserService;
import org.apache.logging.log4j.util.Strings;
import org.springframework.stereotype.Service;
import org.springframework.util.StringUtils;

import java.util.List;
import java.util.Objects;
import java.util.Optional;

@Service
@AllArgsConstructor
public class UserServiceImpl implements UserService {

    private UserRepository userRepository;

    @Override
    public User createUser(User user) {
        return userRepository.save(user);
    }

    @Override
    public User getUserById(Long userId) {
        Optional optionalUser = userRepository.findById(userId);
        return optionalUser.get();
    }

    @Override
    public List getAllUsers() {
        return userRepository.findAll();
    }

    @Override
    public User updateUser(User user) {
        User existingUser = userRepository.findById(user.getId()).get();
        existingUser.setFirstName(user.getFirstName());
        existingUser.setLastName(user.getLastName());
        existingUser.setEmail(user.getEmail());
        User updatedUser = userRepository.save(existingUser);
        return updatedUser;
    }

    @Override
    public void deleteUser(Long userId) {
        userRepository.deleteById(userId);
    }
}
Create Controller Layer - UserController
We’ll now create the REST APIs for creating, retrieving, updating, and deleting a User resource.
Let's create UserController class and let's build CRUD REST API's for User resource:
package net.javaguides.springboot.controller;

import lombok.AllArgsConstructor;
import net.javaguides.springboot.entity.User;
import net.javaguides.springboot.service.UserService;
import org.springframework.http.HttpStatus;
import org.springframework.http.ResponseEntity;
import org.springframework.web.bind.annotation.*;

import java.util.List;

@RestController
@AllArgsConstructor
@RequestMapping("api/users")
public class UserController {

    private UserService userService;

    // build create User REST API
    @PostMapping
    public ResponseEntity< User> createUser(@RequestBody User user){
        User savedUser = userService.createUser(user);
        return new ResponseEntity<>(savedUser, HttpStatus.CREATED);
    }

    // build get user by id REST API
    // http://localhost:8080/api/users/1
    @GetMapping("{id}")
    public ResponseEntity< User> getUserById(@PathVariable("id") Long userId){
        User user = userService.getUserById(userId);
        return new ResponseEntity<>(user, HttpStatus.OK);
    }

    // Build Get All Users REST API
    // http://localhost:8080/api/users
    @GetMapping
    public ResponseEntity< List< User>> getAllUsers(){
        List< User> users = userService.getAllUsers();
        return new ResponseEntity<>(users, HttpStatus.OK);
    }

    // Build Update User REST API
    @PutMapping("{id}")
    // http://localhost:8080/api/users/1
    public ResponseEntity< User> updateUser(@PathVariable("id") Long userId,
                                           @RequestBody User user){
        user.setId(userId);
        User updatedUser = userService.updateUser(user);
        return new ResponseEntity<>(updatedUser, HttpStatus.OK);
    }

    // Build Delete User REST API
    @DeleteMapping("{id}")
    public ResponseEntity< String> deleteUser(@PathVariable("id") Long userId){
        userService.deleteUser(userId);
        return new ResponseEntity<>("User successfully deleted!", HttpStatus.OK);
    }
}
Running Spring Boot Application
Run the spring boot application from IDE:
From your IDE, run the SpringbootRestfulWebservicesApplication.main() method as a standalone
Java class that will start the embedded Tomcat server on port 8080 and point the browser tohttp://localhost:8080/.
Run the spring boot application using the command line:
Just go to the root directory of the application and type the following command to run it -
$ mvn spring-boot:run
The application will start at Spring Boot’s default tomcat port 8080.
Test CRUD RESTful WebServices using Postman Client
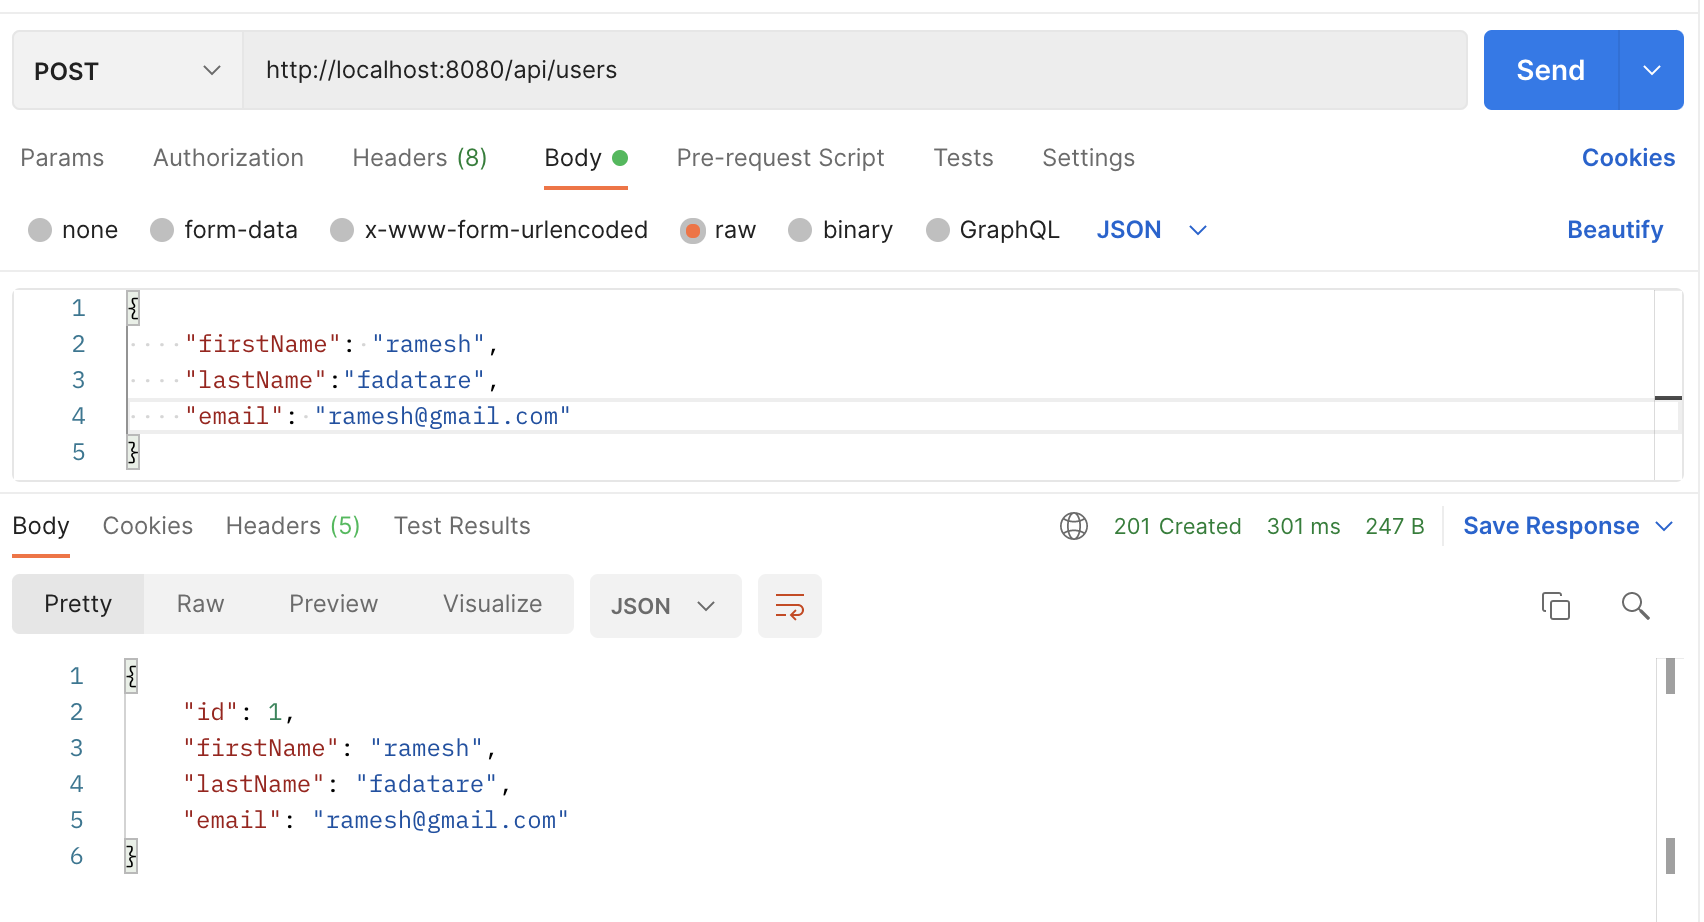
Create User REST API:
Request URL: http://localhost:8080/api/users
HTTP Method: POST
Request Body:
{
    "firstName": "ramesh",
    "lastName":"fadatare",
    "email": "ramesh@gmail.com"
}
Refer to this screenshot to test Create User REST API:
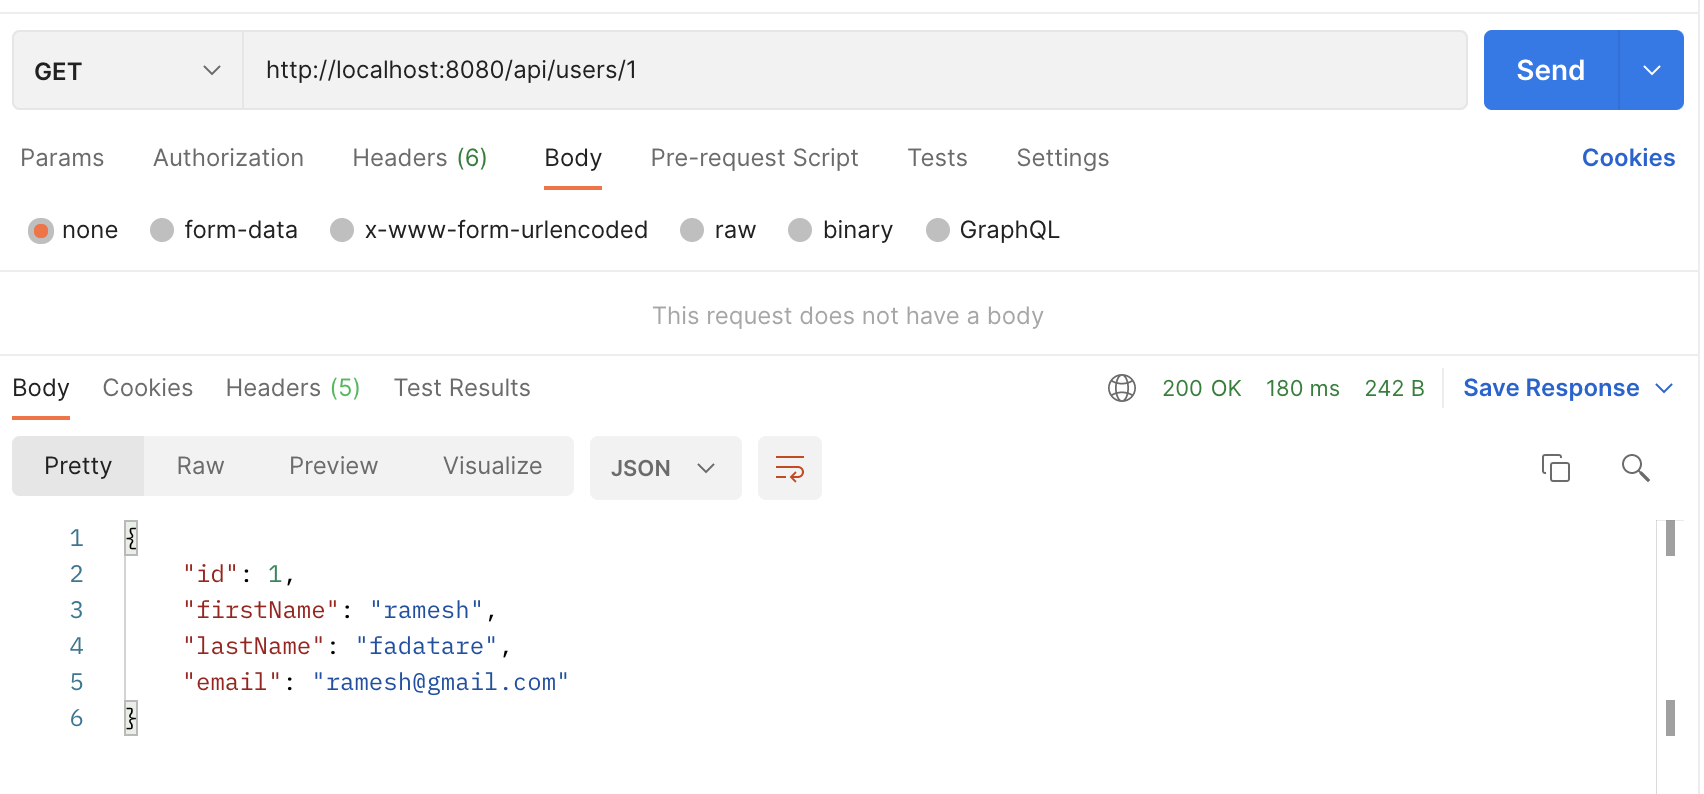
Get User REST API:
Request URL:http://localhost:8080/api/users/1
HTTP Method: GET
Refer to this screenshot to test GET User REST API:
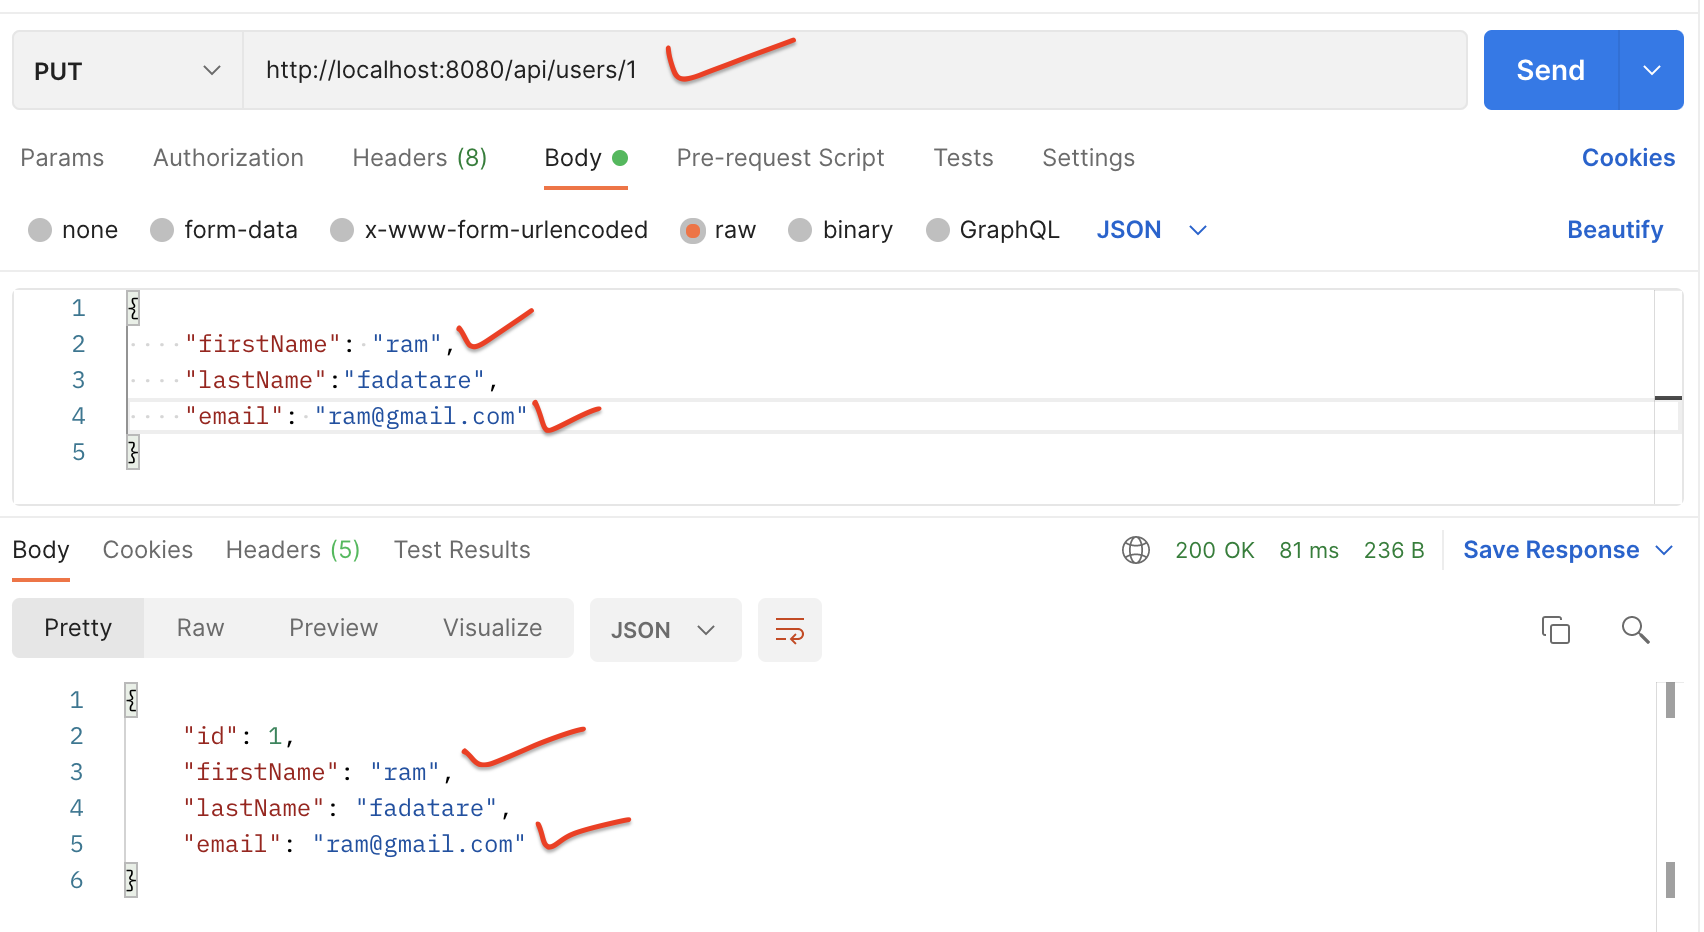
Update User REST API:
Request URL: http://localhost:8080/api/users/1
HTTP Method: PUT
Request Body:
{
    "firstName": "ram",
    "lastName":"fadatare",
    "email": "ram@gmail.com"
}
Refer to this screenshot to test the Update User REST API:
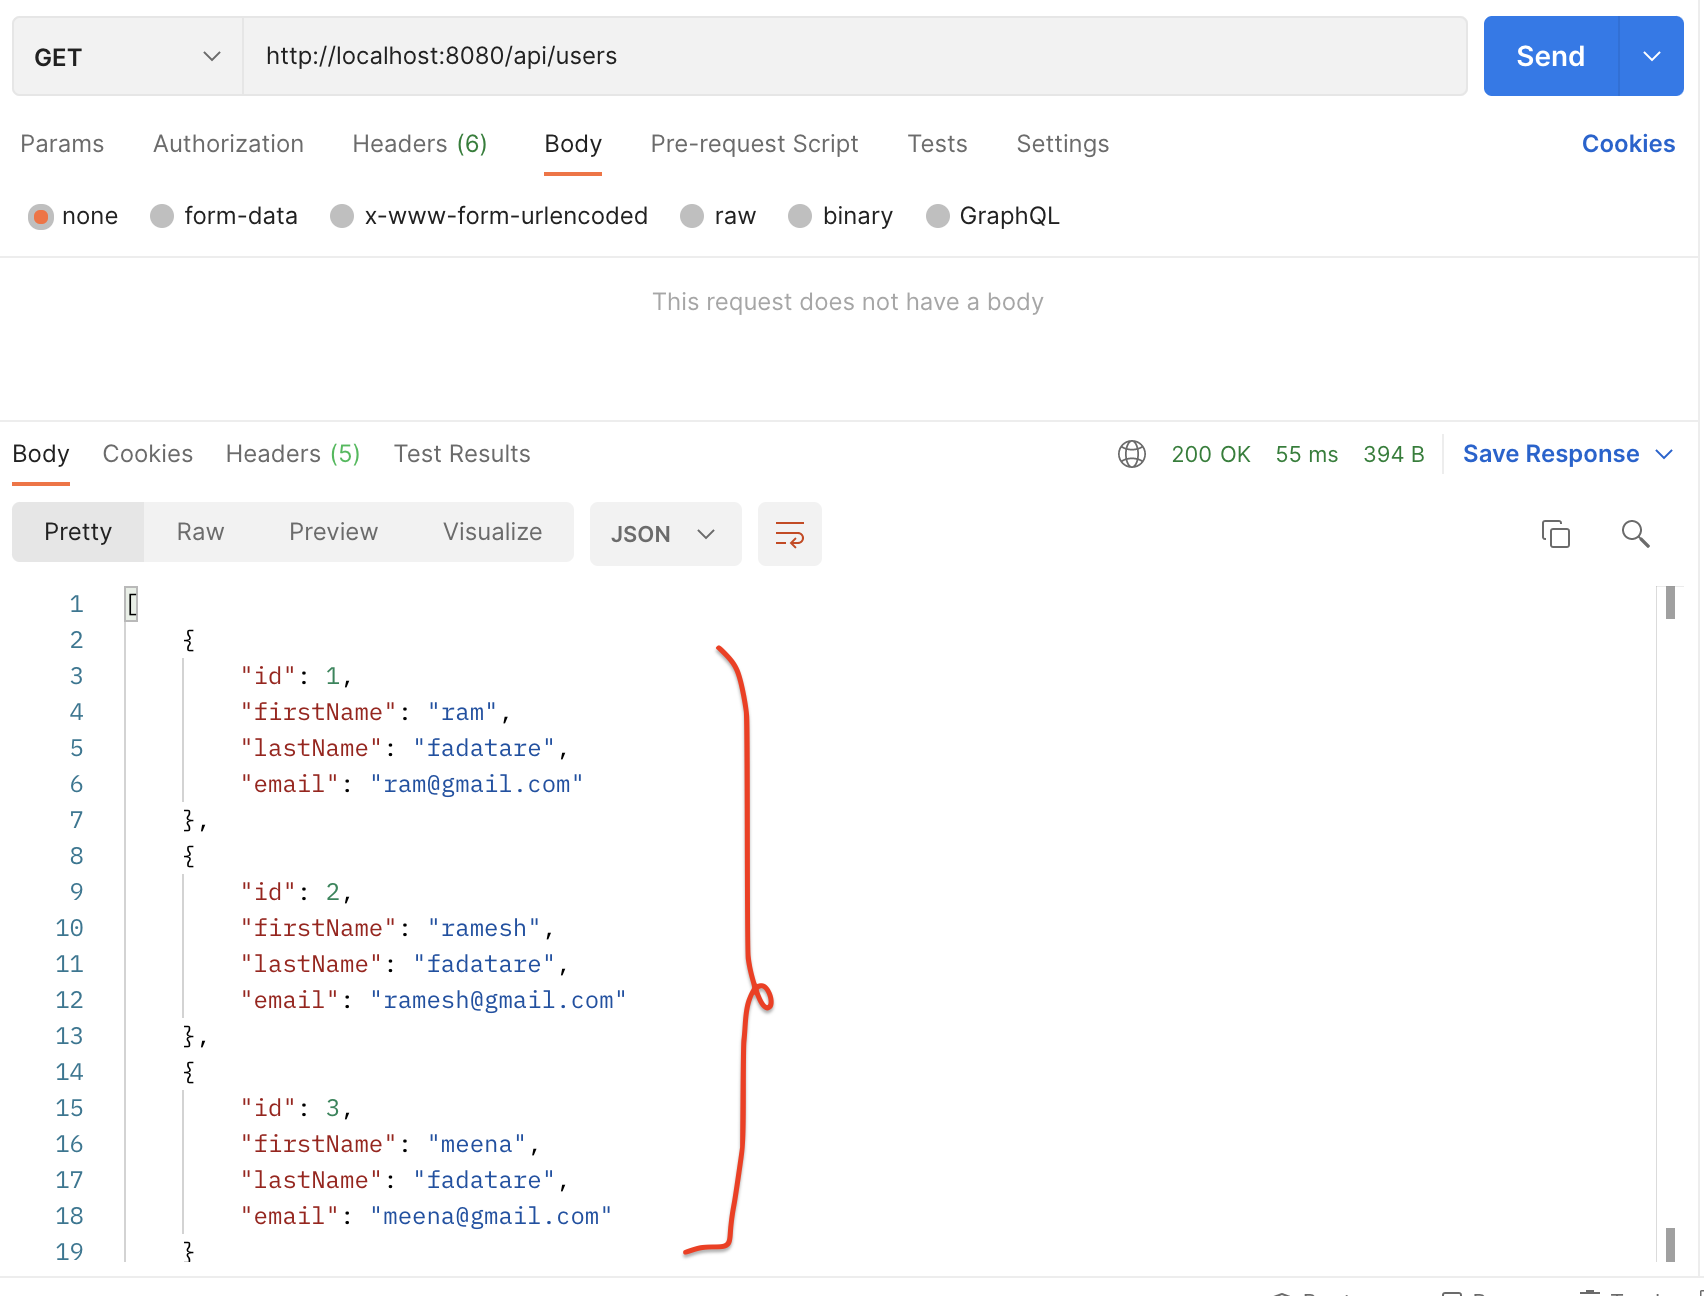
Get All Users REST API:
Request URL:http://localhost:8080/api/users
HTTP Method: GET
Refer to this screenshot to test GET All User REST API:
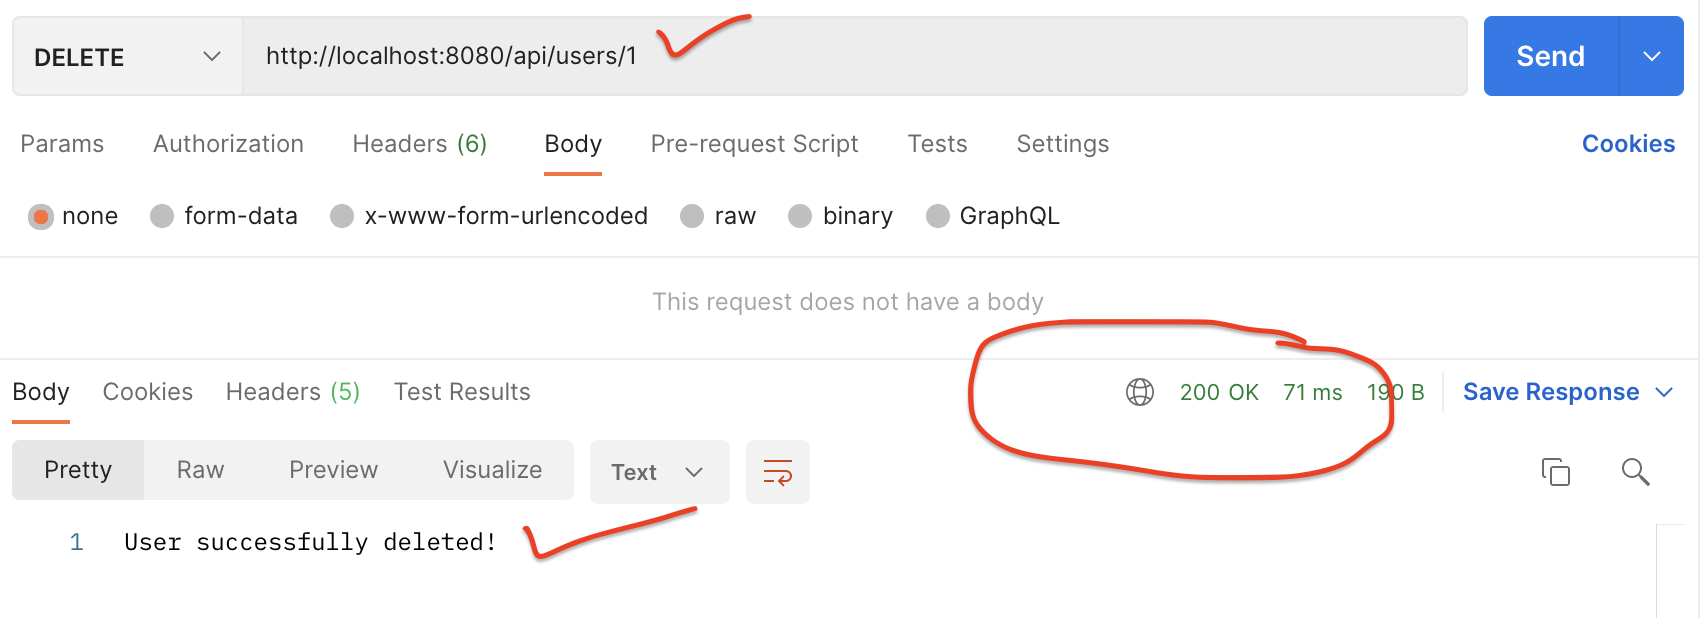
DELETE User REST API:
Request URL:http://localhost:8080/api/users/1
HTTP Method: DELETE
Refer to this screenshot to test Delete User REST API:
Source Code on GitHub
The source code of this tutorial is available on my GitHub repository at Spring Boot CRUD RESTful WebServices